How to Flush Coolant and Service the Radiator on a Xterra
Coolant flush and radiator service for 2000-2015 Nissan Xterra: engine-specific capacities, correct coolant by generation, refill, and air-bleeding steps.

One-tap dark, screen-awake, step-by-step reading for hands-on work.
How to Flush Coolant and Service the Radiator on a Nissan Xterra (Complete Guide)
Keeping your Nissan Xterra's engine running cool is non-negotiable, whether you're tackling a rocky trail or just commuting to work. The cooling system is the unsung hero that prevents overheating and catastrophic engine damage. Over time, the coolant breaks down, loses its protective properties, and can become contaminated with rust and debris. Neglecting this vital fluid can lead to clogged radiators, failing water pumps, and a compromised heater core - costly repairs that are easily avoided with routine maintenance.
This comprehensive guide is designed for the hands-on Xterra owner. We'll walk you through every step of a complete coolant flush and fill, from gathering the right tools to bleeding the last bit of air out of the system. We’ll cover the specific capacities, coolant types, and part numbers for every Xterra model, from the first-generation (WD22) to the second-generation (N50). Performing this service yourself not only saves you money but also gives you a deeper understanding of your vehicle's health.
Ready to get your hands dirty and ensure your Xterra is ready for любые adventure? Let’s dive in and give your cooling system the refresh it deserves.
Why a Coolant Flush is Critical for Your Xterra
Your Xterra's cooling system does more than just prevent overheating; it maintains the engine's optimal operating temperature for efficiency and longevity. The coolant, or antifreeze, contains chemical inhibitors that prevent corrosion, rust, and scale buildup inside the engine block, radiator, and heater core. Over thousands of miles, these inhibitors deplete, turning the fluid acidic and abrasive. This old, contaminated coolant can eat away at metal components and clog narrow passages, leading to poor performance and eventual failure. A complete flush removes all the old fluid and contaminants, restoring protection and ensuring your engine stays healthy.
Looking for expert Xterra maintenance advice? Check out our detailed DIY Maintenance Guide for Nissan Xterra (2000-2015) and learn how to maintain your vehicle like a pro.
Essential Tools and Materials for the Job
Before you begin, gather the necessary tools and supplies to ensure the job goes smoothly. Having everything on hand will prevent mid-project trips to the auto parts store.
- Drain Pan: A large, 5-gallon or larger capacity pan to safely capture the old coolant.
- Funnel: A long, narrow funnel to make refilling the radiator mess-free.
- Safety Gear: Nitrile gloves and safety glasses are a must when handling coolant.
- Wrenches and Sockets: A basic set of metric sockets (10mm, 12mm, 14mm) and pliers.
- Channel-Lock Pliers: For releasing spring-style hose clamps.
- Shop Rags or Absorbent Pads: For cleaning up any spills.
- Distilled Water: Essential for flushing the system. Never use tap water, as its minerals can cause deposits.
- Fresh Coolant: The correct type and amount for your specific Xterra model (see below).
- (Optional) Jack and Jack Stands: To safely raise the front of the vehicle for easier access to the radiator petcock.
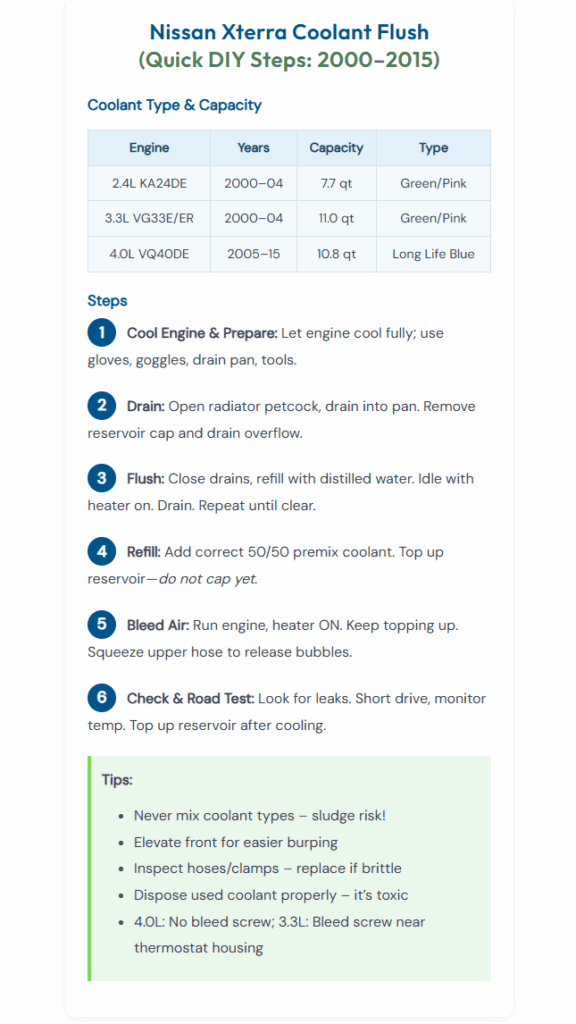
Xterra Coolant Specifications: Capacity & Type by Engine
Using the correct type and amount of coolant is crucial. Different Xterra generations and engines have unique requirements. Using the wrong fluid can lead to chemical reactions that cause gelling and system-wide blockages.
The table below outlines the specific details for each Nissan Xterra engine. Always verify your engine type before purchasing fluids or parts.
| Engine Model | Model Years | Coolant Capacity | Recommended Coolant Type | OEM Thermostat (180°F) | Radiator/Reservoir Cap |
|---|---|---|---|---|---|
| 2.4L KA24DE | 2000–2004 | ~7.7 qt (7.3 L) | Nissan Green/Pink (or Zerex Asian Pink) | 21200-0C82A | 16 psi spring cap on reservoir |
| 3.3L VG33E (NA) | 2000–2004 | ~11.0 qt (10.95 L) | Nissan Green/Pink (or Zerex Asian Pink) | 21200-42L0A | 16 psi spring cap on reservoir |
| 3.3L VG33ER (SC) | 2001–2004 | ~11.0 qt (10.95 L) | Nissan Green/Pink (or Zerex Asian Pink) | 21200-42L0A | 16 psi spring cap on reservoir |
| 4.0L VQ40DE | 2005–2015 | ~10.8 qt (10.2 L) | Nissan Long Life Blue (or Zerex Asian Blue) | 21200-31U1B | 16 psi spring cap on reservoir |
Important Note on Coolant Mixing:
Never mix different coolant types. For example, do not add common orange Dex-Cool to a system designed for Nissan Blue or Green/Pink coolant. Doing so can create a thick, gel-like sludge that will clog your entire cooling system. When in doubt, stick with genuine Nissan coolant or a high-quality aftermarket equivalent that explicitly meets Nissan specifications.
Step-by-Step Guide to Flushing Your Nissan Xterra's Coolant
With your tools gathered and the correct coolant on hand, it's time to perform the flush. Follow these steps carefully for a successful service.
This process involves draining the old fluid, flushing the system clean with distilled water, and refilling with a fresh 50/50 mixture.
Step 1: Preparation and Safety
First, ensure the vehicle is prepared correctly and you've taken the necessary safety precautions.
- Cool the Engine: The engine must be completely cold to the touch. Opening a hot cooling system can cause severe burns from pressurized steam and coolant. Let the vehicle sit for several hours or overnight.
- Park Safely: Park on a level surface, engage the parking brake, and chock the rear wheels. If you need more room to work underneath, safely lift the front of the vehicle with a jack and secure it on jack stands.
- Set the Heater: Turn the ignition to the "On" position (without starting the engine) and set the heater controls to full hot with the fan on low. This opens the heater core valve, allowing it to be drained and flushed along with the rest of the system.
- Relieve Pressure: Slowly twist the radiator or reservoir cap to the first stop to release any residual pressure. Cover it with a rag as you remove it completely.
Step 2: Draining the Old Coolant
Now it's time to drain all the old fluid from the radiator and engine block.
- Position the Drain Pan: Place your large drain pan directly under the radiator's drain petcock.
- Drain the Radiator:
- 2000–2004 Xterra (1st Gen): The petcock is a small plastic plug located on the bottom of the radiator, typically on the passenger side. Turn it counter-clockwise to open. If it's stuck, use pliers gently.
- 2005–2015 Xterra (2nd Gen): The petcock is also on the lower passenger side of the radiator.
- Drain the Reservoir: Siphon or remove the coolant overflow reservoir and pour its contents into the drain pan.
- Drain the Engine Block (Recommended for V6): To get all the old coolant out, you should also drain the engine block.
- 3.3L V6 (VG33E/ER): The easiest method is to disconnect the lower radiator hose from the engine side. This will drain most of the coolant from the block.
- 4.0L V6 (VQ40DE): This engine often has dedicated block drain plugs on the sides of the engine block. If accessible, remove them with a deep socket. Otherwise, disconnecting the lower radiator hose is also effective.
Allow the system to drain completely, which may take several minutes.
Step 3: Flushing the System with Distilled Water
Once drained, you need to flush out any remaining contaminants.
- Close Drains: Close the radiator petcock and reconnect any hoses you removed.
- Fill with Distilled Water: Using your funnel, fill the radiator to the top with distilled water.
- Circulate the Water: Leave the radiator cap off, start the engine, and let it idle. Keep the heater on high. You'll see the water level drop as the thermostat opens and it circulates. Continue adding water to keep the radiator full.
- Drain Again: After running for 5-10 minutes (or until the upper hose is hot), shut off the engine, let it cool down slightly, and then drain the water just as you did the coolant.
- Repeat: Repeat this flush cycle 2-3 times, or until the water draining out runs clear. This ensures all the old, nasty coolant is gone.
Step 4: Refilling with Fresh Coolant
With the system clean, it's time to add the new coolant.
- Close All Drains: Double-check that the radiator petcock and any block drain plugs are securely tightened. Reconnect the lower radiator hose if you removed it.
- Add Coolant: Slowly pour your 50/50 pre-mixed coolant into the radiator until it's full. If using concentrate, pre-mix it with distilled water in a clean container before adding.
- Fill Reservoir: Fill the coolant overflow reservoir to the "MAX" line. Do not install the radiator cap just yet.
Step 5: Bleeding the Air (Burping the System)
This is the most critical step. Trapped air pockets can cause overheating and heater problems.
- Start the Engine: With the radiator cap still off, start the engine and let it idle. Keep the heater on its highest setting.
- Top Off Coolant: As the engine warms up and the thermostat opens, the coolant level will drop. Continue to add coolant to the radiator, keeping it full to the base of the filler neck.
- Squeeze Hoses: Gently squeeze the upper radiator hose with a gloved hand. You should see air bubbles emerge in the radiator filler neck. Continue doing this until bubbles stop appearing.
- Check for Heat: Feel the air coming from your interior vents. Once it's blowing hot, you know coolant is circulating through the heater core.
- Wait for Fan Cycle: Let the engine run until it reaches normal operating temperature and the electric cooling fans cycle on and off at least once. This confirms the thermostat is working correctly.
- Install Cap: Once the coolant level is stable and no more bubbles are emerging, top off the radiator one last time and securely install the cap.
Bleeding Note:
The 3.3L V6 engine often has an air bleed screw on or near the thermostat housing to help release trapped air. The 4.0L VQ40DE does not have a bleed screw; bleeding is accomplished solely by running the engine with the cap off.
Step 6: Final Checks and Road Test
You're almost done! A few final checks will ensure everything is perfect.
- Check for Leaks: With the engine still running, use a flashlight to inspect the radiator petcock, hose connections, and any drain plugs for leaks.
- Check Reservoir Level: Shut off the engine and check the level in the overflow reservoir. Top it up to the "MAX" line if needed.
- Road Test: Take your Xterra for a 10-15 minute drive. Keep an eye on the temperature gauge to ensure it stays in the normal range.
- Final Cool-Down Check: After the drive, let the engine cool down completely. Open the hood and check the coolant level in the reservoir one last time. It's normal for it to have dropped slightly as the last bits of air worked their way out. Top it off to the "MAX" line if necessary.
- Properly Dispose of Old Coolant: Transfer the used coolant from your drain pan into a sealable container. It is highly toxic. Take it to an auto parts store or a local hazardous waste recycling facility for proper disposal.
Tips & Tricks for a Flawless Coolant Flush
- Elevate the Front: Parking the Xterra with its nose pointing uphill or jacking up the front end can help air naturally travel to the radiator filler neck, making the bleeding process much easier.
- Inspect While You're In There: A coolant service is the perfect time to inspect your radiator hoses, heater hoses, and clamps. If hoses feel brittle, mushy, or look cracked, replace them now to prevent a future breakdown.
- Don't Overtighten the Petcock: The plastic radiator drain petcock is fragile. Tighten it just until it's snug. Overtightening can crack it, leading to a frustrating and costly radiator replacement.
- Use an OEM Thermostat: While aftermarket thermostats are cheaper, they have a higher failure rate. An OEM or high-quality equivalent thermostat is a smart investment to ensure your engine's temperature is regulated correctly. A thermostat that sticks closed will cause rapid overheating.
FAQ
- Why is a coolant flush important for my Nissan Xterra?
A coolant flush removes old, contaminated fluid, preventing rust, corrosion, and clogs in your engine’s cooling system, thus ensuring optimal performance and preventing costly repairs. - What type and amount of coolant does my Xterra use?
The proper coolant type and capacity depend on your engine:
- 2.4L/3.3L engines (2000–2004): ~7.7–11 qt Nissan Green or Pink coolant
- 4.0L engine (2005–2015): ~10.8 qt Nissan Long Life Blue coolant
Never mix types—use only what’s specified for your model.
- How do I properly bleed air from the cooling system after refilling?
With the radiator cap off, run the engine and keep the heater on high. Continuously top off coolant as the level drops and gently squeeze the upper radiator hose to help release trapped air until no more bubbles emerge. - How often should the coolant be flushed on a Nissan Xterra?
It’s recommended to flush and replace the coolant every 30,000 to 50,000 miles or per your owner’s manual. More frequent changes may be needed if the fluid appears dirty or if you drive in severe conditions. - Can I use tap water instead of distilled water for flushing?
No. Always use distilled water when flushing the cooling system to prevent mineral deposits and scaling inside the radiator and engine. - What safety precautions should I take when flushing my Xterra’s cooling system?
Only flush when the engine is completely cold to avoid burns. Use gloves and safety glasses, and ensure the vehicle is securely parked with the parking brake on and wheels chocked if lifted.
Conclusion - Coolant Flush
Congratulations! You've successfully performed a complete coolant flush on your Nissan Xterra. This essential maintenance task not only protects your engine from damage but also ensures your heating and cooling systems operate at peak efficiency. By taking the time to do it right - using the correct fluids, thoroughly flushing the system, and meticulously bleeding the air - you've extended the life of your vehicle and saved a significant amount of money compared to a shop service.
Remember to keep an eye on your coolant level and temperature gauge for the next few drives. Now that you've mastered this procedure, you can tackle future maintenance with even more confidence. Keep your Xterra cool, and it will keep taking you on incredible journeys for years to come.