Xterra Catalytic Converter Failure: Symptoms & Solutions
Diagnose P0420/P0430 codes, power loss, and rotten-egg smell on your Nissan Xterra. Covers root causes, OEM part numbers, CARB rules, and DIY replacement.

One-tap dark, screen-awake, step-by-step reading for hands-on work.
Not sure this is the problem? Run the symptom diagnostic to compare likely causes.
Nissan Xterra Catalytic Converter Failure: Symptoms, Diagnosis & Solutions
The dreaded glow of the Check Engine Light, a sudden lack of power when you hit the gas, and a strange smell wafting from the exhaust - these are classic signs that something is wrong with your Nissan Xterra. While several issues can cause these symptoms, one of the most common culprits, especially on higher-mileage vehicles, is a failing catalytic converter. This critical emissions component is essential for keeping your exhaust clean and your engine running smoothly, but when it goes bad, it can cause a cascade of frustrating problems.
A failed catalytic converter isn't just an emissions issue that will cause you to fail an inspection; it's a major restriction in your exhaust system that can choke your engine's performance and tank your fuel economy. Ignoring the signs can lead to more significant and expensive engine damage down the road. Fortunately, understanding the symptoms, knowing how to properly diagnose the problem, and exploring your replacement options can empower you to get your rugged Xterra back on the road and running right.
This comprehensive guide will walk you through everything you need to know about Nissan Xterra catalytic converter failure.
We’ll cover the specific symptoms for each engine variant, step-by-step diagnostic procedures you can perform at home, the common root causes you must address, and a detailed breakdown of your replacement options, from DIY costs to professional repair.
What Is a Catalytic Converter and Why Does It Fail?
Before diving into diagnostics, it’s important to understand what this component does and why it's so prone to failure over time. A catalytic converter is a vital part of your Xterra's exhaust system designed to convert harmful pollutants produced by the engine - namely carbon monoxide (CO), unburned hydrocarbons (HC), and nitrogen oxides (NOx) - into less harmful substances like carbon dioxide (CO₂), water (H₂O), and nitrogen (N₂).
Inside its metal casing is a ceramic honeycomb monolith coated with a mix of precious metals like platinum, palladium, and rhodium. These metals act as catalysts, triggering chemical reactions that clean the exhaust gases as they pass through. For this process to work, the converter must reach a high operating temperature, often between 1,200°F and 1,600°F. Over time, this intense heat, combined with contaminants from the engine, can cause the converter to degrade in one of three ways:
- Clogging: Soot from a rich fuel mixture or ash from burning oil can physically block the passages in the ceramic honeycomb, creating a major exhaust restriction.
- Contamination: Oil, coolant, or excessive unburned fuel can coat the precious metals, rendering them unable to catalyze the exhaust gases effectively. This is often referred to as "poisoning" the converter.
- Meltdown: Extreme temperatures, usually caused by raw fuel igniting inside the converter from an engine misfire, can literally melt the ceramic core, causing it to collapse and create a severe blockage.
Common Symptoms of a Failing Xterra Catalytic Converter
When your Xterra's catalytic converter begins to fail, it will send several clear signals. While some symptoms are universal across all models, others can be specific to your engine type. Paying close attention to these signs is the first step toward a correct diagnosis.
Performance Problems: The Telltale Signs
A clogged or inefficient converter directly impacts how your engine breathes, leading to noticeable performance issues.
- Severe Loss of Power: This is the most common complaint. The engine feels sluggish, struggles to accelerate, and may bog down under load, especially when climbing hills or trying to pass on the highway.
- Poor Fuel Economy: A restricted exhaust forces your engine to work much harder to expel gases, which significantly increases fuel consumption. You may notice a sudden drop of 5-10% or more in your average MPG.
- Rough Idle or Stalling: In severe cases of clogging, the exhaust backpressure can become so high that it prevents the engine from idling smoothly or even causes it to stall.
Check Engine Light and Diagnostic Codes
Your Xterra's computer (ECU) constantly monitors the catalytic converter's efficiency using oxygen (O₂) sensors. When it detects a problem, it will illuminate the Check Engine Light and store specific trouble codes.
- P0420 – Catalyst System Efficiency Below Threshold (Bank 1): This is the most common code for a failing converter. On the 2.4L 4-cylinder engine, this is the only code you'll see. On V6 models (3.3L and 4.0L), this code points to the converter on Bank 1, which is typically the passenger side.
- P0430 – Catalyst System Efficiency Below Threshold (Bank 2): This code is specific to V6 engines and indicates a problem with the converter on Bank 2, which is the driver's side.
- P0421/P0431 – Warm-Up Catalyst Efficiency Below Threshold: These codes are less common but point to a problem with the converter's efficiency specifically during the engine's warm-up phase.
Physical Clues: Smells, Sounds, and Heat
Sometimes, you can use your senses to detect a failing converter before the performance issues become severe.
- Rotten Egg Smell: A strong sulfur or "rotten egg" odor from the exhaust is a classic sign. This happens when the converter is no longer able to process the trace amounts of hydrogen sulfide in the fuel.
- Rattling Noise: If the internal ceramic honeycomb has broken apart, you may hear a rattling sound from underneath the vehicle, especially during startup or acceleration.
- Excessive Heat: A clogged converter traps an enormous amount of heat. You may feel this heat radiating from under the floorboards of the vehicle, particularly on the passenger side.
How to Diagnose a Clogged Catalytic Converter on Your Xterra
A P0420 or P0430 code doesn't automatically mean you need a new converter. A faulty oxygen sensor can sometimes trigger the same code. To avoid replacing a perfectly good part, it’s crucial to perform a few diagnostic tests to confirm the converter is truly the problem.
Step 1: Scan for OBD-II Codes
Your first step should always be to use an OBD-II scanner to read the trouble codes. Confirm whether you have a P0420, P0430, or both. Importantly, check for any other codes related to misfires (P0300-P0306), fuel system issues, or oxygen sensors, as these could be the root cause of the converter failure.
Step 2: Analyze Live Oxygen Sensor Data
This is the most definitive test for converter efficiency. Using a scanner with live data capability, monitor the voltage signals from the upstream (before the cat) and downstream (after the cat) oxygen sensors for the corresponding bank.
- A Healthy Converter: The upstream O₂ sensor (B1S1 or B2S1) will fluctuate rapidly between ~0.1 and ~0.9 volts. The downstream O₂ sensor (B1S2 or B2S2) should show a much steadier, flatter voltage, typically high (~0.7-0.9 volts).
- A Failing Converter: The downstream O₂ sensor's voltage will start to mimic the rapid fluctuations of the upstream sensor. This indicates that the converter is not "scrubbing" the exhaust, and the un-catalyzed gases are hitting the downstream sensor.
Step 3: Perform a Backpressure Test
A clogged converter creates excessive backpressure in the exhaust. You can test this in two ways:
- Vacuum Gauge Test: Connect a vacuum gauge to a manifold vacuum port. A healthy engine should hold a steady 18-22 inHg of vacuum at idle. Briefly rev the engine to 2,500 RPM. The vacuum should dip and then quickly return to the idle reading. If the vacuum drops and fails to recover or continues to fall as you hold the RPMs, it's a strong sign of an exhaust restriction.
- Exhaust Backpressure Gauge: For a direct measurement, you can remove the upstream O₂ sensor and thread in an exhaust backpressure gauge. At 2,500 RPM, the backpressure should be less than 1-2 PSI. Anything higher indicates a significant clog.
Step 4: Check Temperatures with an Infrared Thermometer
A working catalytic converter generates heat as it functions. Use an infrared (IR) thermometer to measure the temperature of the exhaust pipe right before the converter and right after it.
Pro Tip: A healthy, functioning catalytic converter should be significantly hotter at its outlet than its inlet. A temperature rise of at least 100°F is a good sign. If the outlet temperature is the same as or cooler than the inlet, the catalyst is no longer active.
Step 5: Conduct a Visual Inspection
Get under your Xterra (after the exhaust has cooled completely) and inspect the converter. Look for signs of extreme heat like discolored or blued metal, cracks in the housing, or damage to the heat shields. Gently tap the converter with a rubber mallet; if you hear a rattle, the internal core has likely disintegrated.
The Real Culprits: Root Causes of Xterra Catalytic Converter Failure
Simply replacing a failed catalytic converter without addressing the underlying cause is a recipe for repeat failure. The new converter will likely fail in a matter of months. A dead cat is almost always a symptom of a deeper engine problem.
Engine Oil Contamination
Oil burning is a primary killer of catalytic converters. When oil enters the combustion chamber due to worn piston rings, failing valve seals, or a clogged PCV system, it gets burned and sent down the exhaust, where it coats the catalyst and renders it useless.
Unburned Fuel and Misfires
Any condition that dumps raw fuel into the exhaust will quickly destroy a converter.
- Engine Misfires: A faulty spark plug, ignition coil, or wire can cause a cylinder to misfire, sending a shot of unburned fuel directly into the hot converter, where it can ignite and melt the ceramic core.
- Rich Fuel Mixture: A leaking fuel injector, a faulty fuel pressure regulator, or a bad mass airflow (MAF) sensor can cause the engine to run too rich, overwhelming the converter with fuel.
Known Xterra Engine Issues
Certain Xterra models have specific weak points that are known to cause catalytic converter failure. The most infamous is the timing chain guide wear on the 4.0L VQ40DE engine (2005-2015). As the guides wear, the timing chain slackens, which can affect valve timing and lead to increased oil consumption, directly contributing to converter contamination.
Replacing Your Xterra's Catalytic Converter: A Complete Guide
Once you've confirmed the converter is bad and have addressed the root cause, it's time for a replacement. You have several options, each with different costs and considerations.
OEM vs. Aftermarket Parts
| Part Type | Pros | Cons | Estimated Cost (per side) |
|---|---|---|---|
| OEM (Nissan) | Perfect fitment, highest quality, emissions warranty | Extremely expensive | $700 - $1,800+ |
| Aftermarket (Direct-Fit) | Much more affordable, good fitment | Quality varies by brand, may not last as long as OEM | $300 - $600 |
| Aftermarket (Universal) | Cheapest option | Requires cutting and welding, lowest quality | $100 - $250 |
Example OEM Part Numbers:
- 3.3L V6 (VG33E):
14002-9S200(Right-Hand Manifold with Integrated Cat)
- 4.0L V6 (VQ40DE):
208A3-EA20A(Driver Side)208A3-EA20B(Passenger Side)
Federal vs. California (CARB) Emissions Standards
This is a critical distinction. If your Xterra is registered in California, New York, or any other state that has adopted CARB (California Air Resources Board) emissions standards, you must install a CARB-compliant converter. These parts are more expensive but are built to a higher standard. Federal (EPA-compliant) converters cannot legally be installed on vehicles in these states. Check the emissions label under your hood to confirm which standard your vehicle meets.
Cost Breakdown: DIY vs. Professional Repair
- Professional Repair: Expect to pay between $1,200 and $2,500+ for a single converter replacement at a shop, depending on whether you use OEM or aftermarket parts. Labor typically runs 2-4 hours.
- DIY Repair: By using an aftermarket direct-fit converter and doing the labor yourself, you can complete the job for $350 to $700 in parts, plus the cost of new gaskets and hardware.
Installation Walkthrough and Key Torque Specs
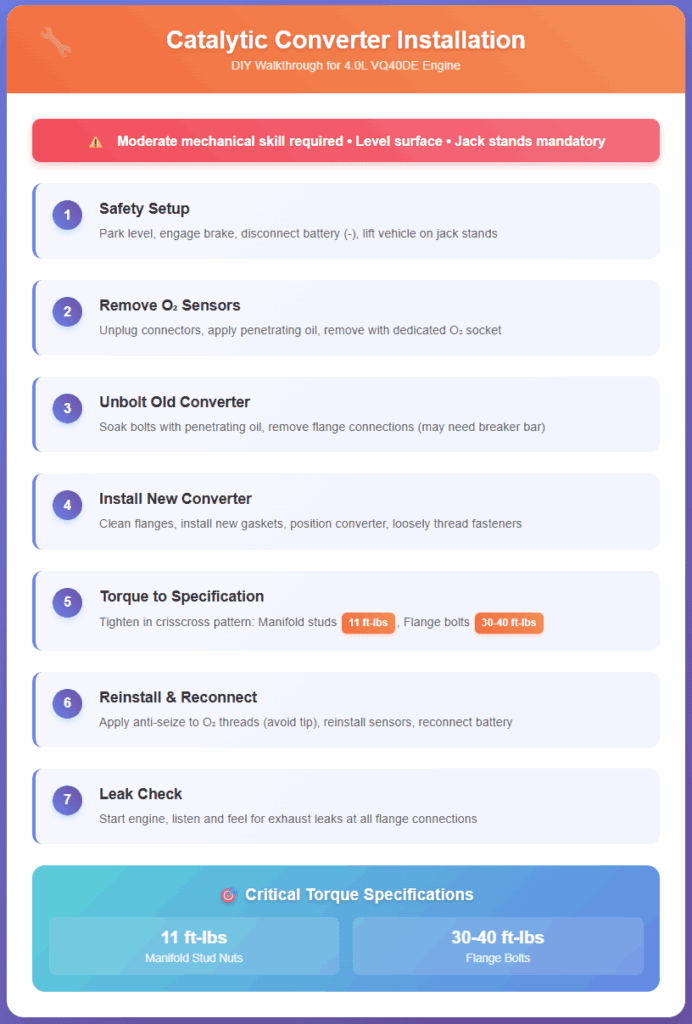
Replacing the converter is a manageable DIY job for someone with moderate mechanical skill.
- Safety First: Park on a level surface, engage the parking brake, and disconnect the negative battery terminal. Safely lift and support the vehicle on jack stands.
- Remove O₂ Sensors: Unplug the electrical connectors for the oxygen sensors and carefully remove them from the exhaust pipes using a dedicated O₂ sensor socket. Apply penetrating oil to the threads beforehand if they are rusty.
- Unbolt the Old Converter: Soak the flange bolts and nuts with penetrating oil. Remove the bolts connecting the converter to the exhaust manifold and the rest of the exhaust system. You may need a breaker bar for stubborn, rusty hardware.
- Install the New Converter: Clean the flange surfaces and install new gaskets. Position the new converter and loosely thread all the nuts and bolts.
- Torque Everything to Spec: Tighten the bolts in a crisscross pattern to ensure an even seal. For the 4.0L VQ40DE, the exhaust manifold-to-converter stud nuts should be torqued to approximately 11 ft-lbs. Flange bolts are typically higher, around 30-40 ft-lbs.
- Reinstall Sensors and Reconnect Battery: Apply a small amount of anti-seize compound to the O₂ sensor threads (avoiding the sensor tip) and tighten them. Reconnect the battery.
- Check for Leaks: Start the engine and listen and feel for any exhaust leaks at the flanges.
Tips & Tricks for a Healthy Catalytic Converter
- Fix the Root Cause First: This is the golden rule. Never install a new catalytic converter without first fixing the misfire, oil consumption, or rich fuel condition that killed the old one. The new part will fail quickly if you don't.
- Don't Skimp on Gaskets and Hardware: Always use new exhaust gaskets and apply anti-seize to sensor threads. A small leak before the converter can trick the O₂ sensors and lead to an improper air/fuel mixture, damaging the new cat over time.
- Perform a "Break-In" Run: After installing a new converter, many manufacturers recommend running the engine at around 2,500 RPM for 10-15 minutes. This helps burn off any manufacturing residues and allows the catalyst to properly "light off" for the first time.
- Stay on Top of Engine Maintenance: The best way to extend the life of your catalytic converter is through diligent engine maintenance. Replace spark plugs on schedule, fix oil leaks promptly, and never ignore a Check Engine Light.
Nissan Xterra Catalytic Converter FAQ
- What is a catalytic converter and what does it do on the Nissan Xterra?
The catalytic converter reduces harmful emissions from your engine by converting carbon monoxide, hydrocarbons, and nitrogen oxides into less dangerous substances like CO₂, H₂O, and N₂. - What are common symptoms of catalytic converter failure in the Xterra?
Symptoms include severe power loss, poor fuel economy, rough idle or stalling, a “rotten egg” smell, rattling noise, excessive heat from under the vehicle, and illuminated Check Engine Light with codes like P0420 or P0430. - Which diagnostic trouble codes (DTCs) point to a bad Xterra catalytic converter?
The most common are P0420 (Bank 1) and P0430 (Bank 2). Less common codes like P0421/P0431 indicate warm-up catalyst efficiency issues. - How can I accurately diagnose a failing or clogged catalytic converter?
Use an OBD-II scanner for codes, monitor live oxygen sensor data, perform a vacuum or backpressure test, check exhaust temperatures with an IR thermometer, and conduct a visual and rattle inspection. - What typically causes the catalytic converter to fail on the Xterra?
Common causes are oil contamination (from worn rings, seals), unburned fuel due to misfires or rich mixtures, and known issues like timing chain guide wear in 4.0L engines. - Is there a difference between OEM and aftermarket catalytic converters?
Yes. OEM converters offer perfect fit and quality but are expensive. Aftermarket options are more affordable; quality varies. Universal units require cutting/welding but cost less. - Do emission standards affect my replacement options?
Yes. If registered in California, NY, or other CARB states, you must install a CARB-compliant converter. Federal converters are only legal in non-CARB states. - What is the approximate cost of replacement for the Xterra’s catalytic converter?
Professional repair: $1,200–$2,500+ (OEM/aftermarket, labor included). DIY replacement: $350–$700 for direct-fit aftermarket parts, plus gaskets/hardware. - Can I replace the catalytic converter myself?
Yes, if you have moderate mechanical skill. Steps include unplugging O₂ sensors, removing old converter, installing a new one with fresh gaskets, torquing bolts to spec, and checking for exhaust leaks. - How can I extend the lifespan of my new catalytic converter?
Fix all root engine issues before installing a new converter, use new gaskets/hardware, break in the new part at 2,500 RPM for 10–15 mins, and stay diligent with routine engine maintenance and repairs.
Nissan Xterra Catalytic Converter Failure - Summary
A failing catalytic converter on your Nissan Xterra can seem like a daunting and expensive problem, but it’s one you can confidently tackle with the right knowledge. By understanding the distinct symptoms - from power loss and foul smells to the definitive P0420 and P0430 codes - you can move from suspicion to an accurate diagnosis. Remember that a failed converter is often the victim of another engine ailment, and identifying and fixing that root cause is the most critical step in the entire process.
Your next steps are clear. If you suspect a faulty converter, start by scanning for codes. If a P0420 or P0430 appears, use a scanner's live data to check your oxygen sensor readings - this will provide the most conclusive evidence. Address any misfire, fuel system, or oil consumption issues before you even think about buying a new part.
Whether you choose to take on the replacement yourself to save a significant amount of money or entrust the job to a professional, you are now equipped to make an informed decision. By following these guidelines, you can ensure your Xterra passes its next emissions test with flying colors and restores the reliable performance you depend on for all your adventures.