Xterra Frame Rust Repair: The DIY Guide
Stop Nissan Xterra frame rust before it turns structural: inspection, PPE, grinding, rust converters, patch welding, undercoating, and generation hotspots.

One-tap dark, screen-awake, step-by-step reading for hands-on work.
Nissan Xterra Frame Rust Repair: The Complete DIY Guide
The Nissan Xterra has earned its legendary status as a rugged, no-nonsense SUV capable of tackling challenging trails and backroads with ease. It's a beloved vehicle for adventurers and off-road enthusiasts. However, like many tough body-on-frame vehicles of its era, the Xterra has a well-known Achilles' heel: frame rust. Especially for owners in the "salt belt" or coastal regions, the slow, creeping corrosion can turn a minor cosmetic issue into a critical structural failure.
Frame rust is far more than just an eyesore. The steel frame is the backbone of your Xterra, supporting the engine, suspension, and body. When corrosion eats away at this foundation, it compromises the vehicle's integrity, handling, and ultimately, its safety. Fortunately, for the dedicated owner with the right tools and a can-do attitude, tackling frame rust is a manageable project. Whether you're dealing with early-stage surface rust or more advanced corrosion, this guide will walk you through every step of the process.
From initial inspection and safety precautions to the nitty-gritty of welding patches and applying protective coatings, we'll cover the specific issues affecting both 1st-Gen (2000–2004) and 2nd-Gen (2005–2015) models. Get ready to roll up your sleeves, because saving your Xterra's frame is one of the most rewarding jobs you can do.
Is Your Xterra's Frame Safe? A Guide to Rust Assessment
Before you buy a single tool or product, the most critical step is a thorough and honest assessment of your Xterra's frame. Understanding the severity of the corrosion will determine whether you're facing a manageable DIY weekend project or a job that requires a professional frame and welding expert.
How to Properly Inspect Your Frame
To get a true picture of the rust situation, you need to get up close and personal with your vehicle's undercarriage.
- Park and Secure: Park the Xterra on a flat, level surface like a garage floor or driveway. Chock the wheels securely.
- Lift the Vehicle: Using a quality floor jack, lift the vehicle and place it securely on at least four heavy-duty jack stands. Never work under a vehicle supported only by a jack.
- Expose the Frame: Remove any skid plates, plastic splash guards, and fender liners that obstruct your view of the frame rails and crossmembers.
- Inspect with Light and Tools: Grab a bright flashlight and a small hammer or a pointed tool like a pick hammer or old screwdriver. Go over every inch of the frame, paying close attention to known trouble spots (which we'll cover below).
- Tap Test: Gently but firmly tap any suspect areas with your hammer. Solid, healthy metal will produce a sharp "ping" sound. Rotted, thin metal will make a dull "thud" and may even crumble or puncture under the hammer's force.
Surface Rust vs. Structural Damage: When to Walk Away
It's vital to distinguish between treatable rust and frame-condemning rot.
- Surface Rust: This looks like flaking paint, orange discoloration, and scaly patches. The underlying metal is still solid and thick. This is the ideal candidate for a DIY repair.
- Structural Damage: This involves deep pitting, visible cracks, or holes that go completely through the frame. If the metal is soft, crumbles, or has lost significant thickness, the structural integrity is compromised.
Critical Safety Warning: If you find large holes, severe cracks near suspension mounting points, or sections of the frame that have collapsed or separated, this is beyond a simple DIY fix. This level of damage requires professional repair by a certified frame technician to ensure the vehicle is safe to drive.
Essential Safety Gear (PPE)
Working with rust is a dirty, hazardous job. The dust from grinding rust and old coatings contains metal particles and chemicals you do not want to breathe.
- Respirator: A NIOSH-rated N95 or P100 respirator is non-negotiable to protect your lungs from dust and paint fumes.
- Eye and Face Protection: A full-face shield over safety glasses is the best combination to protect you from flying debris, wire bristles, and chemical splashes.
- Gloves: Heavy-duty work gloves for handling tools and chemical-resistant gloves when working with degreasers and rust converters.
- Protective Clothing: Long sleeves and pants will protect your skin. If you're welding, a fire-resistant welding jacket is essential.
The same safety equipment and lifting procedures you'd use for major engine work like timing chain replacement apply here - proper jack stands, safety glasses, and a methodical approach are essential.
Gathering Your Arsenal: Tools and Materials for Frame Repair
Having the right tools will make the difference between a frustrating ordeal and a successful repair. While you can get by with basic equipment, a few key power tools will save you hours of labor.
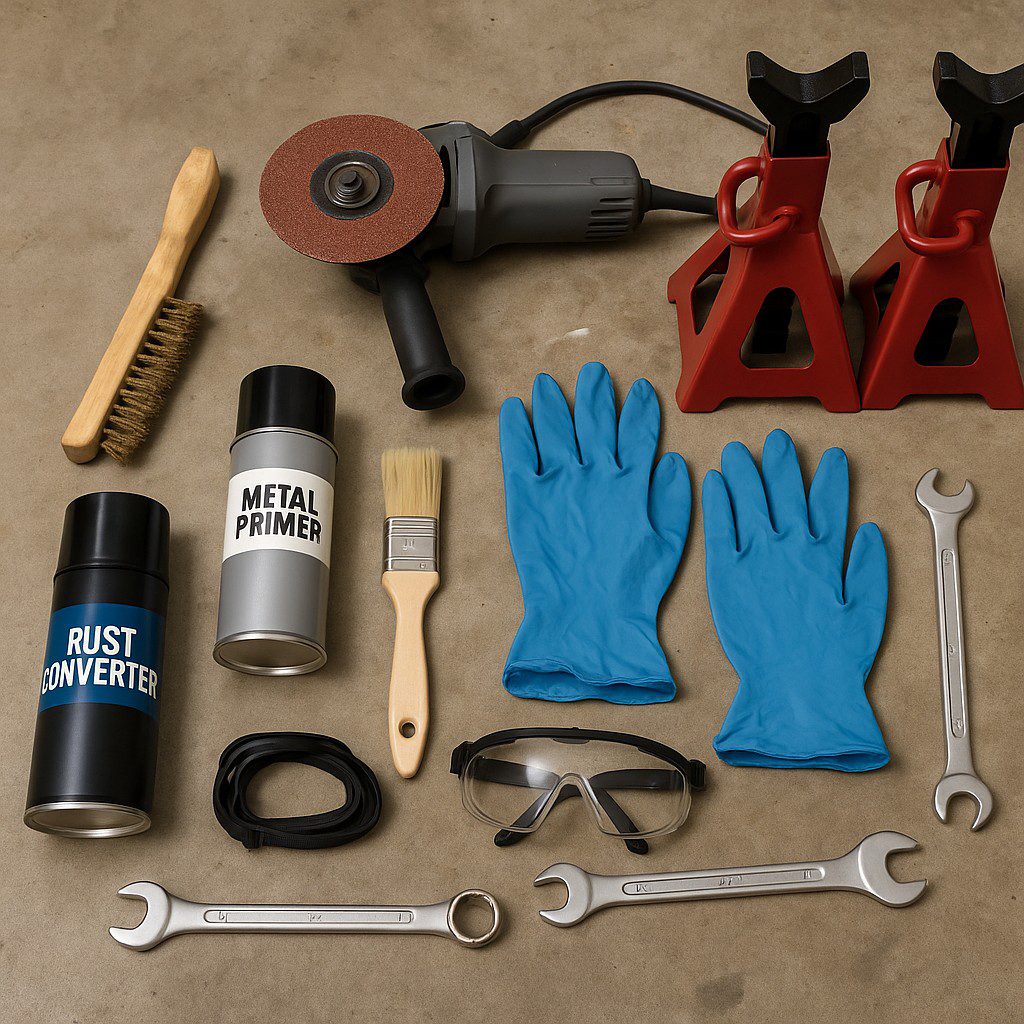
Power Tools & Accessories
- Angle Grinder (4.5"): Your primary weapon for rust removal. Outfit it with a variety of attachments:
- Wire Cup/Wheel Brush: For stripping away scale and loose rust quickly.
- Flap Discs (80-120 grit): Excellent for grinding down heavier rust and smoothing welds.
- Cut-off Wheels: Necessary for cutting out rotted metal sections for patching.
- Corded Drill: Perfect for getting into tighter spaces with smaller wire wheel attachments.
- Detail Sander: An optional but helpful tool for smoothing out flat surfaces before painting.
Hand Tools & Prep Supplies
- Jack & Jack Stands: A high-quality floor jack and a set of four robust jack stands are mandatory for safety.
- Wheel Chocks: To prevent the vehicle from rolling.
- Metric Socket/Wrench Set: For removing skid plates and other components.
- Hammer and Chisel: Useful for knocking off heavy, thick chunks of scale.
- Degreaser: Products like brake cleaner or a dedicated heavy-duty degreaser to clean the frame before treatment.
- Sandpaper: Assorted grits from 80 to 400 for hand-sanding tight spots and final prep.
Welding Equipment (For Patch Repairs)
- MIG Welder: A wire-feed MIG welder is the most user-friendly option for welding frame patches.
- MIG Wire: ER70S-6 wire in a 0.030" or 0.035" diameter is a good all-around choice for this type of steel.
- Welding Magnets & Clamps: To hold your steel patches perfectly in place for tacking.
- Fire Extinguisher: Keep one within arm's reach at all times when welding or grinding.
Choosing the Right Rust Treatment Products
The market is flooded with rust-fighting products. Choosing the right system of products - from converter to final coating - is crucial for a long-lasting repair that won't need to be redone next year.
Rust Converters and Encapsulators
After you've mechanically removed all the loose rust, you'll still have some residual rust in the pits of the metal. This is where a chemical treatment comes in.
- Rust Converters: These are phosphoric acid-based products that chemically react with iron oxide (rust) and convert it into a stable, black, paintable compound called iron phosphate.
- Rust Encapsulators: These are moisture-cured urethane coatings that seal and isolate rust from oxygen and moisture, effectively starving it. Products like POR-15 and Eastwood Rust Encapsulator are industry favorites because they form an incredibly hard, non-porous barrier.
Primers and Chassis Paints
Once the rust is neutralized, you must seal the bare metal to protect it.
- Primer: An epoxy-based or self-etching primer provides the best adhesion to bare steel and creates a strong foundation for your topcoat.
- Chassis Paint: Don't use regular spray paint. You need a durable, chip-resistant coating like a dedicated chassis black paint or even a spray-on bedliner material for maximum durability.
Steel for Patching: What You Need
If you have to cut out sections of your frame, you'll need to weld in new metal. Use 12-gauge or 14-gauge cold-rolled mild steel that matches the original thickness of your Xterra's frame. You can buy this in small sheets from a local metal supplier.
Undercoatings and Rust Inhibitors
The final layer of defense is a flexible, moisture-repelling undercoating.
- Rubberized Undercoating: Sprays on from an aerosol can and provides a thick, pliable barrier against rocks, salt, and moisture.
- Cavity Wax / Oil-Based Inhibitors: Products like Fluid Film or Krown are designed to be sprayed inside the frame rails. This oil-based wax "creeps" into seams and crevices, displacing moisture and preventing rust from starting on the inside.
The Step-by-Step Guide to Nissan Xterra Frame Rust Repair
With your vehicle safely supported and your tools ready, it's time to begin the repair process. The key is to be methodical and not cut corners, especially during the prep work.
- Preparation and Cleaning: Remove any components blocking access to the frame. Thoroughly spray the work area with a degreaser and scrub with a stiff brush to remove all grease, oil, and road grime. Rinse well and let it dry completely.
- Aggressive Rust Removal: Put on your PPE. Using your angle grinder with a wire wheel or flap disc, attack all the rusted areas. Your goal is to remove every bit of loose, flaking rust, scale, and old paint. Take the metal down to either clean, bare steel or tightly adhered, pitted rust.
- Final Wash and Dry: After the grinding is done, the entire area will be covered in fine dust. Wash the exposed frame with soap and water or a metal prep solution to remove all contaminants. Dry it thoroughly with compressed air or by letting it air dry. Good paint adhesion requires a perfectly clean surface.
- Applying a Rust Converter/Encapsulator: Carefully follow the manufacturer's instructions. Brush or spray the product onto the areas where rust remains. Most products require 1-2 thin coats and a specific cure time (often 24 hours) before they can be top-coated. The treated rust should turn a satisfying satin black.
- Cutting Out Compromised Metal (If Needed): For any areas with holes or dangerously thin metal that you identified during inspection, use a cut-off wheel on your angle grinder to carefully cut out the rotten section. Cut back until you reach solid, thick steel on all sides.
- Welding in New Steel Patches: Cut your new steel patch so it's slightly larger than the hole. Clamp it firmly in place. Begin by making small "tack" welds in a few spots to hold it. Then, use a "stitch weld" technique - welding short 1-2 inch beads at a time and alternating sides - to prevent warping the frame with excessive heat.
- Priming and Painting: Once all welds are cool, grind them smooth. Clean the entire repair zone again, then apply 2-3 coats of a high-quality, rust-inhibiting primer to all bare metal and welded areas. Allow it to dry completely.
- Applying a Final Undercoating: Finish the job by applying several coats of chassis paint or a rubberized undercoating over the entire repaired section, overlapping onto the surrounding frame. This provides the final, durable shield against the elements.
- Reassembly: After all coatings have fully cured (check the product instructions, this can take 24-48 hours), reinstall any skid plates, liners, or components you removed.
Generation-Specific Rust Hotspots and Fixes
While all Xterras can rust, each generation has its own particular problem areas that collect moisture and road salt. Knowing where to look will help you focus your inspection and repair efforts.
First-Generation Xterra (2000–2004)
The 1st-Gen models are notorious for rust in the rear half of the frame.
- Rear Leaf Spring Hangers: The brackets that hold the rear leaf springs are major culprits. They can rust through, compromising the rear suspension. If patching, consider reinforcing the area with a thicker plate of steel.
- Rear K-Frame Crossmember: The crossmember located under the spare tire often rots from the inside out. Inspect it carefully and be prepared to cut out and replace sections.
- Lower C-Channel Rails: The C-shaped frame rails are open on the inside, acting as a perfect trap for mud and salt. Focus your cleaning and grinding efforts along the bottom inside edge of these rails.
Second-Generation Xterra (2005–2015)
The 2nd-Gen frame is more boxed, but it still has its weak points, particularly around welded brackets.
- Rear Differential Mounting Brackets: The stamped steel brackets that support the rear differential are known to corrode. Check the welds and the base of the brackets carefully.
- Suspension and Shock Mounts: Any point where a suspension component bolts to the frame is a potential rust spot. Clean and coat these areas thoroughly.
- Frame Boxing: A popular and highly effective modification for 2nd-Gen owners is to "box" the frame. This involves welding a custom-cut steel plate over the open side of the C-channel frame rails, effectively creating a stronger, sealed box frame that is less prone to collecting debris.
Tips & Tricks for a Professional-Level Repair
Here are a few extra tips to help your frame repair project go smoothly and last longer.
- Work in Sections: Don't try to strip and treat the entire frame at once. It can be overwhelming. Divide the frame into four sections (e.g., front-left, rear-left) and complete one section at a time.
- Invest in a Needle Scaler: For incredibly tight corners and heavily scaled rust where a wire wheel can't reach, an air-powered needle scaler is an amazing tool that chips away rust with a bundle of tiny steel rods.
- Embrace Welding Magnets: When fitting patches, strong welding magnets are like having an extra set of hands. They hold the patch perfectly flush and in place, freeing you up to focus on making clean tack welds.
- Consider Strategic Drain Holes: After your repair is complete and fully coated, consider drilling a few small (1/4 inch) drain holes in the absolute lowest points of the frame rails. This can help prevent water from pooling inside the frame in the future.
Long-Term Prevention: Keeping Rust at Bay for Good
After putting in all the hard work to repair your Xterra's frame, the last thing you want is for the rust to return. A proactive maintenance routine is the key to permanent protection.
- Regular Underbody Washing: Especially after winter storms or off-roading trips, thoroughly wash the undercarriage of your Xterra with a pressure washer to blast away salt, mud, and other corrosive grime.
- Annual Rustproofing Treatments: Once a year, preferably in the fall before winter, apply a fresh coat of an oil-based rust inhibitor like Fluid Film or Krown. Make sure to use an extension wand to spray deep inside the frame rails.
- Immediate Touch-Ups: During oil changes or other routine maintenance, give the frame a quick inspection. If you see any new chips or scratches in the coating, clean the spot and apply some touch-up paint immediately to stop rust before it can start.
- Proper Storage: If possible, store your Xterra in a garage or carport to protect it from constant exposure to the elements.
Comparing DIY vs. Professional rust prevention and repair for a Nissan Xterra
| Aspect | DIY Rust Prevention & Repair | Professional Rust Prevention & Repair |
|---|---|---|
| Cost | Low-moderate (tools, PPE, supplies; welding extra) | High (labor, premium materials, shop fees) |
| Tools Needed | Grinder, hand tools, jack stands, PPE, rust treatment products | Specialized welders, lifts, advanced rustproofing gear |
| Skill Level | Moderate-advanced (basic mechanical up to welding) | None – work performed by trained technicians |
| Time Required | Several hours to multiple weekends, depending on extent | 1-3 days (usually quicker turnaround) |
| Result Quality | Varies with skill - can be excellent with care; risk of mistakes | Consistent, professional finish and weld quality |
| Warranty/Guarantee | None (unless using certain product warranties) | Often includes warranty or guarantee |
| Rust Prevention Steps | Cleaning, converter, encapsulator, primer, paint, undercoat | Full underbody clean, sandblasting, pro coatings |
| Access to Equipment | Limited to home/garage tools | Full access to industrial equipment |
| Safety | Personal responsibility; risk if errors in jack/use of tools | High - shop safety standards, insurance, certified staff |
| When Recommended | Surface rust/minor frame issues, if you can weld | Major frame rust, structural repairs, suspension areas |
| Long-term Effectiveness | Good with thorough work and preventive maintenance | Superior for major repairs, highest structural safety |
| Satisfaction | High for enthusiasts; pride in own work | Peace of mind, professional liability |
Summary:
- DIY is suitable for skilled owners dealing with light-to-moderate rust, especially if you have time and patience. It saves money and builds experience, but serious/structural rust should always be evaluated by a professional.
- Professional repair is ideal for advanced rust (holes, near suspension mounts), or when high reliability and safety is critical.
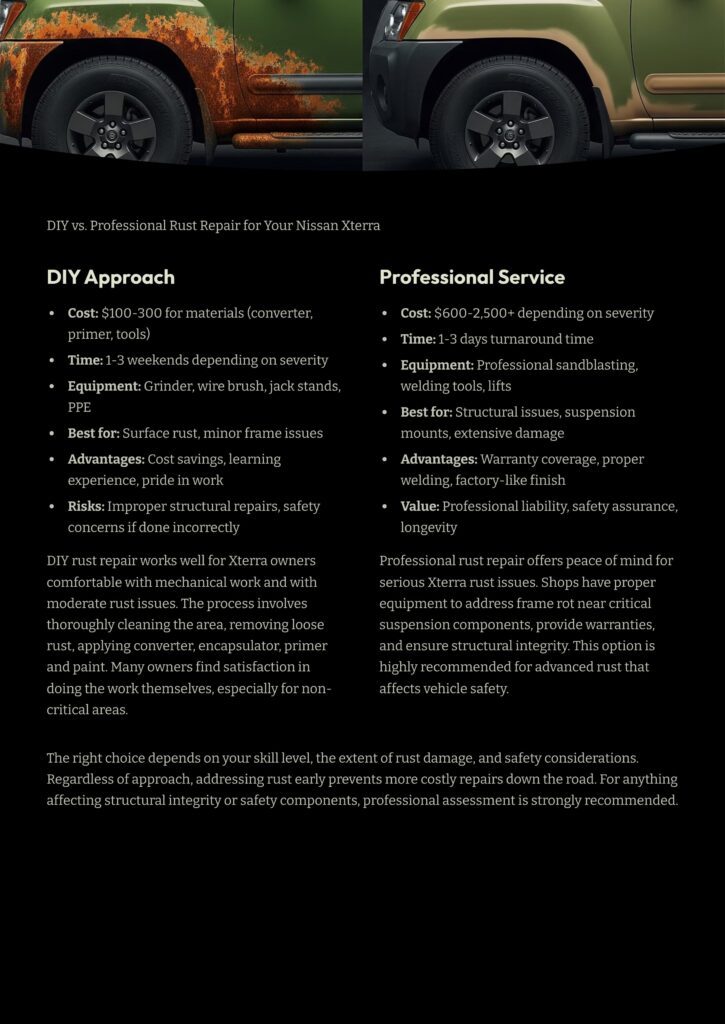
Always weigh cost savings against risks-safety and proper frame integrity are vital for any vehicle, especially trucks and SUVs.
FAQ - Xterra rust Prevention
- Q: How can I tell if my Nissan Xterra’s frame rust is just surface or structural?
A: Surface rust appears as flaking paint and orange patches with solid metal beneath, while structural rust involves deep pits, cracks, or holes impacting the vehicle's integrity. - Q: What’s the first step before starting frame rust repair on a Nissan Xterra?
A: Conduct a thorough inspection of the frame from underneath, using a flashlight and hammer to check for weak spots and distinguish between minor and serious rust. - Q: Which personal protective equipment (PPE) is essential for rust repair?
A: Use a NIOSH-rated respirator, full-face shield, safety glasses, heavy-duty gloves, and protective clothing; wear a welding jacket if welding. - Q: Which power tools are most helpful for removing rust from the frame?
A: An angle grinder with wire brushes, flap discs, and cut-off wheels, plus a corded drill and, optionally, a detail sander for tight spaces. - Q: What type of rust treatment products work best for Xterra frame repair?
A: Use phosphoric-acid rust converters for stable base layers, followed by moisture-cured urethane rust encapsulators (e.g., POR-15), then epoxy-based primer and durable chassis paint. - Q: What steel should I use for patching frame holes?
A: Use 12-gauge or 14-gauge cold-rolled mild steel to match your Xterra’s original frame thickness. - Q: Are certain areas of the Xterra frame prone to rust?
A: Yes - on 1st-Gen Xterras, monitor rear leaf spring hangers, rear K-frame crossmember, and c-channel rails; on 2nd-Gen, check rear differential brackets and suspension mounts. - Q: How do I “box” the frame on a 2nd-Gen Xterra?
A: Weld custom steel plates over open C-channel rails to create a stronger, enclosed frame and prevent debris buildup. - Q: What is the key to long-lasting rust prevention after repair?
A: Wash the undercarriage regularly, apply annual oil-based rust inhibitors, promptly touch up chips, and store the vehicle in a garage if possible. - Q: When should a professional handle frame rust instead of a DIYer?
A: Seek a professional if you find large holes, structural cracks, or severe rust near suspension mounts - these require certified frame repair to ensure safety.
Conclusion - Repairing frame rust on a Nissan Xterra
Repairing frame rust on a Nissan Xterra is a significant undertaking, but it's a battle that can be won. It demands patience, attention to detail, and a serious commitment to safety. By thoroughly assessing the damage, using the right tools and products, and following a methodical repair process, you can restore the structural integrity of your vehicle's foundation and add many more years to its life.
This project is more than just a repair; it's an investment in the longevity and safety of your trusted adventure rig. It empowers you with a deeper understanding of your vehicle and the satisfaction of knowing you saved it from the scrap heap with your own two hands. So gather your gear, put on your safety glasses, and get ready to give your Xterra the solid backbone it deserves for all the miles and memories yet to come.