Xterra Leaf Spring Replacement: The DIY Guide
Replace sagging or broken rear leaf springs on your Nissan Xterra: 1st vs 2nd-gen differences, OEM part numbers, safe lifting, U-bolts, and torque specs.

One-tap dark, screen-awake, step-by-step reading for hands-on work.
Nissan Xterra Leaf Spring Replacement: The Complete DIY Guide
The Nissan Xterra is a legendary SUV, celebrated for its rugged, no-nonsense approach to adventure. Whether you're hauling gear for a weekend camping trip or tackling a challenging trail, its robust suspension is key to its capability. However, after years of service, the rear leaf springs - the backbone of the Xterra's load-carrying capacity - can begin to wear out, sag, and fail. This common issue can lead to a host of problems, from a comical-looking "Carolina Squat" to unsafe handling and a harsh ride.
Fortunately, replacing the leaf springs on a Nissan Xterra is a very manageable DIY project for the home mechanic with the right tools and a bit of patience. Ignoring worn-out springs isn't just an aesthetic issue; it compromises your vehicle's stability, braking, and overall safety. A sagging rear end can alter your alignment, cause premature tire wear, and reduce your ability to carry a load effectively.
This comprehensive guide will walk you through every step of the process, from identifying the symptoms of failing leaf springs to choosing the right parts and executing the replacement safely. We'll cover both first and second-generation Xterras, so you can restore your SUV's ride height, performance, and rugged stance with confidence.
How to Know If Your Xterra's Leaf Springs Are Bad: Key Symptoms
Before you start ordering parts and breaking out the tools, it's crucial to correctly diagnose the problem. Worn-out leaf springs typically give off several clear warning signs that are hard to miss once you know what to look for. A thorough inspection can confirm your suspicions and ensure you're tackling the right repair.
Visual Signs of Failure
The most obvious symptom is a visible sag in the rear of the vehicle. Park your Xterra on level ground and look at its profile. Does the rear sit noticeably lower than the front? You can also measure the distance from the center of the wheel hub to the bottom of the fender flare on all four corners; a significant difference between the front and rear is a dead giveaway. Other visual cues include:
- Uneven Ride Height: One side of the rear may sag more than the other, indicating one spring has failed more severely.
- Cracked or Broken Leaves: Get under the truck with a flashlight and inspect the spring packs themselves. Look for visible cracks, fractures, or completely broken individual leaves. This is especially common on older, first-generation models.
- Flattened Spring Arch: A healthy leaf spring has a distinct upward curve or arch. Worn springs will appear flat or even bend downward (a negative arch).
Audible Clues
Your ears can be just as useful as your eyes in diagnosing suspension issues. Worn leaf springs and their associated components often produce distinct noises, especially when driving over bumps, potholes, or uneven terrain. Listen for:
- Squeaking: A persistent, high-pitched squeak from the rear can indicate friction between the leaves or worn-out bushings.
- Clunking or Banging: Loud clunks when the suspension compresses or extends often point to a broken leaf, loose U-bolts, or completely failed shackle bushings.
Changes in Handling and Ride Quality
Failing leaf springs have a direct impact on how your Xterra drives. Because they are responsible for supporting the vehicle's weight and controlling axle movement, their failure can make the truck feel unstable and unpredictable. Watch out for:
- Excessive Bouncing: If the rear of your Xterra feels floaty or continues to bounce long after hitting a bump, the springs are no longer able to effectively dampen motion.
- Poor Stability: The vehicle might feel like it's swaying or "wandering" in the rear, especially when cornering or carrying a load.
- Harsh Ride: When a spring pack is collapsed or broken, you lose suspension travel, causing the axle to hit the bump stops more frequently and creating a jarring ride.
Generation Gaps: Understanding 1st Gen vs. 2nd Gen Xterra Springs
Nissan made several key changes to the Xterra between the first and second generations, including the design of the rear leaf springs. While the fundamental replacement procedure is nearly identical for both, it's essential to understand the differences to ensure you purchase the correct parts for your vehicle.
First Generation (2000–2004)
The first-gen Xterras typically came equipped with 4-leaf rear spring packs. These were designed to handle the vehicle's original load capacity and are known for their durability, though they are now old enough that fatigue and rust are common culprits for failure. Some early models may have had slightly different spring configurations depending on the engine (4-cylinder vs. V6), but most aftermarket replacements offer a standard or heavy-duty 4-leaf design.
- Common Part Numbers: 55020-7Z001, 55020-7Z101, 55020-8Z900
Second Generation (2005–2015)
The larger and heavier second-gen Xterra received an updated leaf spring design. These models typically use a 3+1 or 4+2 leaf pack configuration, meaning three or four main leaves with an additional shorter, thicker "overload" leaf at the bottom. This design provides a smoother ride when unloaded while still offering support for heavy cargo. The bushings and shackles were also updated for this generation.
- Common Part Numbers: 55020-EA00B, 55020-EA20A
Repair vs. Replace: Why Replacement is Almost Always Better
You might be tempted to find a quick fix, like adding an extra leaf ("add-a-leaf") to a sagging pack or installing longer shackles to regain height. While these can be temporary solutions, they are not recommended for springs that are old, fatigued, or cracked.
Safety First: Attempting to "repair" a cracked or broken leaf spring is unsafe. An add-a-leaf can put additional stress on the remaining old leaves, leading to a catastrophic failure. For safety and long-term reliability, always replace worn-out leaf springs in pairs.
Essential Tools and Equipment for the Job
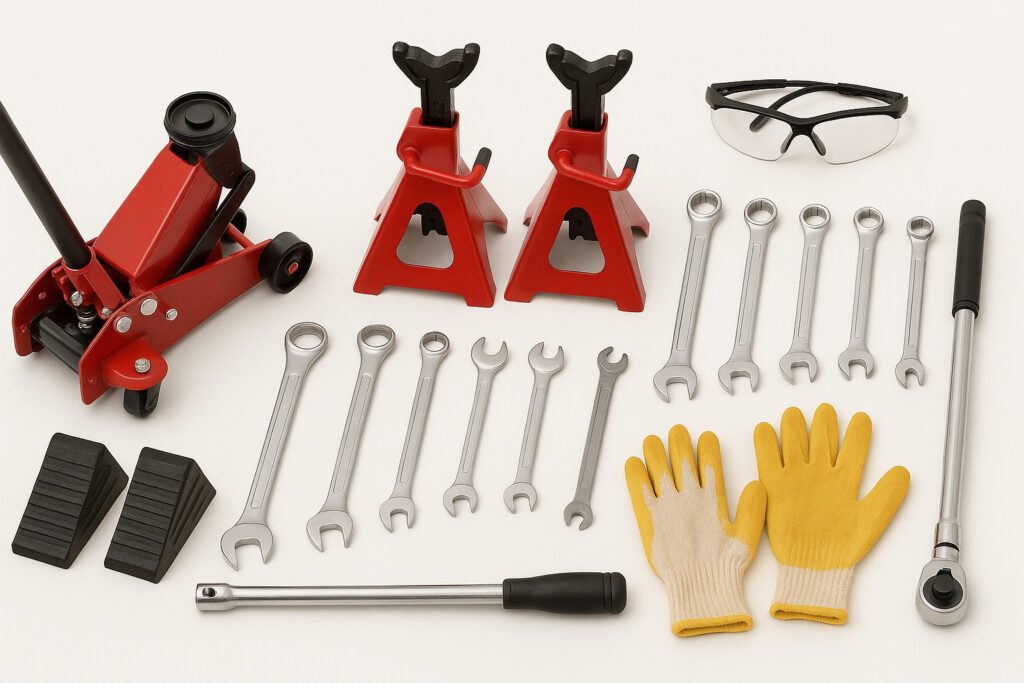
Having the right tools on hand will make this job significantly safer, easier, and more efficient. Before you begin, gather the following equipment. This isn't a job you want to start and then realize you're missing a critical socket or a sturdy enough jack stand.
Lifting & Safety Gear
- Heavy-Duty Floor Jack (3-5 ton capacity): Essential for safely lifting the rear of the Xterra.
- Jack Stands (3-5 ton rating, pair): NEVER work under a vehicle supported only by a jack. You will need at least two sturdy jack stands.
- Wheel Chocks: To secure the front wheels and prevent the vehicle from rolling.
- Safety Glasses and Gloves: Protect yourself from rust, dirt, and potential slips.
Hand Tools
- Metric Socket Set and Wrench Set: You'll commonly need sizes from 17mm to 24mm.
- Breaker Bar: For breaking loose large, rusted bolts on the shackles and pivots.
- Torque Wrench: Absolutely critical for tightening all hardware to factory specifications.
- Penetrating Oil (e.g., PB Blaster): Your best friend for dealing with rusted U-bolts and pivot bolts. Apply it liberally and let it soak.
- Wire Brush: For cleaning rust and debris from the axle perch and frame mounts.
Optional but Helpful Tools
- Impact Wrench (Air or Electric): Can make quick work of removing nuts, but always use a torque wrench for final tightening.
- Bushing Press or Large Sockets/Vise: If you need to press new bushings into the spring eyes or shackles.
- C-Clamps: Can be useful for holding the spring pack together if you need to align it.
Step-by-Step Nissan Xterra Leaf Spring Replacement Guide
With your tools and parts ready, it's time to get to work. This process should be done one side at a time. Follow these steps carefully, prioritizing safety at all times. This guide assumes you are replacing the entire leaf spring assembly.
Now for the main event. Follow these steps carefully for a successful and safe leaf spring replacement. We'll break it down into manageable stages, working on one side of the vehicle at a time.
- Preparation and Safety
Park the Xterra on a flat, level surface and engage the parking brake. Chock the front wheels securely. Loosen the lug nuts on the rear wheels but don't remove them yet. Using your floor jack, lift the rear of the vehicle by placing the jack under the center of the rear differential. Raise it high enough to place your jack stands under the frame rails just in front of the rear wheels. Lower the vehicle onto the jack stands, ensuring it is stable. Now, place the floor jack back under the differential to support the weight of the axle, but do not lift the vehicle off the stands. You can now safely remove the rear wheels. - Disconnect the Shock Absorber
To allow the axle to droop low enough to remove the spring, you must disconnect the lower end of the shock absorber. Locate the lower shock mount bolt on the axle and remove it. This is typically a 17mm or 19mm bolt. The shock will now be free from the axle. - Relieve Spring Tension and Remove U-Bolts
With the shock disconnected, slowly lower the floor jack supporting the differential. This will allow the axle to drop down, relieving all the tension from the leaf spring. Be careful not to lower it too far, as this can strain the brake lines and ABS wires. Once the spring is relaxed, spray the U-bolt threads with penetrating oil. Remove the four nuts securing the two U-bolts that clamp the spring to the axle. Set aside the U-bolts and the bottom plate. - Unbolt the Spring
The spring is now held in place by two bolts: one at the front (the pivot bolt) and one at the rear (the shackle bolt). These are often very tight and rusted. Apply plenty of penetrating oil. Use a breaker bar to remove the nut from the rear shackle bolt first, then drive the bolt out. Next, tackle the front pivot bolt. Once both bolts are removed, the leaf spring is free. Be prepared for its weight - it can be heavy and awkward. - Remove the Old Spring and Prepare for Installation
With a helper, carefully maneuver the old leaf spring out from under the vehicle. Now is the perfect time to clean the frame mounting points and the axle perch with a wire brush. Compare your new spring to the old one to ensure the orientation is correct. If your new springs did not come with bushings pre-installed, press them in now. - Install the New Spring
Position the new leaf spring under the truck. Start by loosely installing the front pivot bolt. Do not tighten the nut yet. Swing the rear of the spring up and loosely install the rear shackle bolt. Again, do not tighten the nut. - Attach the Spring to the Axle
Raise the axle with the floor jack until the axle perch meets the bottom of the new leaf spring. Make sure the center pin on the spring aligns with the hole in the axle perch. Place the new U-bolts over the axle and spring pack, install the bottom plate, and thread on the new nuts. Tighten the U-bolt nuts in a crisscross pattern to ensure even clamping pressure. Torque them to the specification listed below. - Final Steps Before Tightening
Reconnect the lower shock mount to the axle and tighten the bolt. Reinstall the wheels and hand-tighten the lug nuts. Raise the vehicle with the floor jack, remove the jack stands from the frame, and slowly lower the vehicle until its full weight is resting on the suspension.
CRITICAL STEP: Do not perform the final torque on the pivot and shackle bolts until the vehicle's weight is fully on the ground. Tightening them while the suspension is drooping will preload the rubber bushings, causing them to bind and fail prematurely.
- Final Torqueing
With the Xterra on the ground, get underneath and use your torque wrench to tighten the front pivot bolt nut and the rear shackle bolt nut to their final torque specifications. Once complete, torque your wheel lug nuts to spec. Repeat the entire process for the other side.
We recommend: Dorman 929-502 Rear Leaf Spring
Torque Specifications
Proper torque values are crucial for safety. While these can vary slightly by year and model, the following are generally accepted specifications. Always consult a factory service manual for your specific year if possible.
| Component | Torque Spec (1st Gen) | Torque Spec (2nd Gen) |
|---|---|---|
| Front Pivot Nut | 86–108 ft-lbs (117–147 Nm) | Similar, verify with manual |
| Rear Shackle Nuts | 58–72 ft-lbs (78–98 Nm) | Similar, verify with manual |
| U-Bolt Nuts | 12–16 ft-lbs (16–22 Nm) | 34-40 ft-lbs (46-54 Nm) |
| Lower Shock Mount Nut | 58–72 ft-lbs (78–98 Nm) | 70-85 ft-lbs (95-115 Nm) |
Note: The low torque spec for 1st Gen U-bolts is correct per factory manuals. They are designed to clamp the assembly, not stretch. Do not overtighten.
Tips & Tricks for a Smooth Installation
Even the best-planned projects can have hiccups. Here are a few pro tips to make your Nissan Xterra leaf spring replacement go more smoothly and ensure your new suspension lasts for years to come.
- Soak Everything in Penetrating Oil. The night before you start, generously spray every nut and bolt you plan to remove with a high-quality penetrating oil. This one simple step can save you hours of fighting with seized hardware.
- Replace All Supporting Hardware. Don't reuse old U-bolts, shackles, or bushings. U-bolts are designed to stretch once and should always be replaced. New shackles and bushings are inexpensive and will ensure your entire rear suspension system is refreshed and free of weak points.
- Check Your Brake Lines. When you lower the axle to remove the springs, keep a close eye on the flexible brake lines and any ABS sensor wires. Ensure they have enough slack and are not being stretched or pulled, which could cause damage.
- Do a Post-Installation Check. After driving for about 50-100 miles, get back under your Xterra and re-check the torque on all the hardware, especially the U-bolt nuts. This ensures that nothing has settled and worked itself loose.
DIY vs. Professional Leaf Spring Replacement: Cost & Comparison
| Aspect | DIY Leaf Spring Replacement | Professional Leaf Spring Replacement |
|---|---|---|
| Cost | $200–$500 (parts), $0–$100 (tools, if not owned) | $600–$1,200+ (parts & labor, varies by location) |
| Time Required | Several hours (depends on skill, equipment) | 1–2 hours (usually faster) |
| Required Tools | Floor jack, jack stands, wrenches, breaker bar, etc. | None - provided by shop |
| Skill Level | Intermediate (mechanical experience helps) | Not required |
| Warranty on Work | None (unless parts warranty) | Usually offered on parts and labor |
| Convenience | Must work outdoors or in a garage | Drop off, pick up when ready |
| Potential Risks | Safety (if vehicle not supported properly, mistakes) | Minimal - covered by shop’s experience |
| Customization | Full control over parts/brands used | Some shops may restrict to certain suppliers |
| Post-Install Inspection | Must self-inspect, retorque bolts after settling | Shop usually includes inspection/follow-up |
| Learning Opportunity | High - good for enthusiasts and skill building | Low - learning not involved |
FAQ - Leaf Springs Replacement
- Q: What are signs that my Xterra’s leaf springs need replacement?
A: Visible sag in the rear, uneven ride height, cracked or broken leaves, flattened spring arch, squeaking, clunking noises, excessive bouncing, poor stability, or a harsh ride. - Q: Are leaf spring problems common for the Nissan Xterra?
A: Yes, especially on older models. Years of use, heavy loads, and rust often result in worn, sagging, or broken rear leaf springs. - Q: What’s the difference between first and second-generation Xterra leaf springs?
A: 1st Gen (2000–2004) uses primarily 4-leaf packs. 2nd Gen (2005–2015) uses either a 3+1 or 4+2 design, with updated bushings and shackles. - Q: Can I repair my leaf springs or should I always replace them?
A: Replacement is strongly recommended. “Repairs” like add-a-leaf are only temporary and can lead to further issues or even failure. - Q: What tools do I need for this job?
A: Heavy-duty floor jack, jack stands, wheel chocks, metric wrench set, breaker bar, torque wrench, penetrating oil, and several other basic hand tools. - Q: How do I stay safe while replacing the springs?
A: Always use jack stands (never work under a vehicle supported only by a jack), secure the vehicle with wheel chocks, and wear safety glasses and gloves. - Q: Is it necessary to replace both leaf springs at once?
A: Yes, always replace springs in pairs. Replacing just one can cause imbalance and new problems. - Q: Should I replace the U-bolts and bushings as well?
A: Absolutely. Never reuse U-bolts - they’re designed for single use. New bushings and shackles ensure the suspension is fully refreshed. - Q: What are the most critical steps to avoid mistakes?
A: Don’t tighten the shackle and pivot bolts until the truck is on the ground. Always torque all bolts to specification after installation. - Q: What should I check after installation?
A: After 50-100 miles, recheck all fastener torques, especially the U-bolt nuts, to ensure nothing has loosened due to settling.
Conclusion - DIY Leaf Springs Replacement
Replacing the leaf springs on your Nissan Xterra is a rewarding project that restores the vehicle's intended performance, safety, and appearance. By tackling this job yourself, you not only save a significant amount on labor costs but also gain a deeper understanding of how your trusty SUV works. That sagging rear end and jarring ride will be a distant memory, replaced by a confident stance and a restored load-carrying ability.
Remember the keys to success: prioritize safety with proper lifting procedures, replace springs and hardware in pairs, and meticulously torque everything to specification after the vehicle's weight is back on the suspension. With your new springs installed, your Xterra is ready for its next chapter of adventures, whether that's hauling supplies from the hardware store or exploring a remote trail.
Now that your rear suspension is back in top form, it might be a great time to inspect your front suspension components and shock absorbers. A balanced and fully refreshed suspension system will ensure your Xterra handles predictably and performs at its best for many more miles to come.
Related DIY articles
- Looking to tackle common Nissan Xterra issues? Start with our comprehensive guides designed for every DIY enthusiast! For rust problems, check out our Nissan Xterra Frame Rust Repair: The Complete DIY Guide.
- If your fuel gauge is acting up, don’t miss the Nissan Xterra Fuel Gauge Sending Unit: Diagnosis & Replacement Guide.
- For cooling system concerns, our Nissan Xterra SMOD Radiator Bypass: Your Complete Fix Guide will help you prevent serious engine damage.
- If you’re hearing odd engine noises, use our Nissan Xterra Timing Chain Noise Fix: A Complete Guide for step-by-step solutions.
- And for heater or coolant issues, see our Nissan Xterra Heater Hose Firewall Leak: Complete Fix Guide to keep your Xterra running smoothly.