Xterra Fuel Gauge Sending Unit: Diagnosis & Replacement Guide
Fix an erratic or dead Xterra fuel gauge: P0460-P0463 codes, multimeter testing, 1st-gen access panel and 2nd-gen tank-drop methods, and OEM part numbers.

One-tap dark, screen-awake, step-by-step reading for hands-on work.
Not sure this is the problem? Run the symptom diagnostic to compare likely causes.
Nissan Xterra Fuel Gauge Sending Unit: Diagnosis & Replacement Guide
Is the fuel gauge on your Nissan Xterra acting possessed? One minute it’s full, the next it’s on empty, and the low fuel light is flickering like a disco ball. This frustrating and unreliable behavior is a classic sign of a failing fuel gauge sending unit. While it might seem like a complex electrical issue, replacing the sender is a very manageable DIY project that can save you hundreds of dollars compared to a trip to the dealership.
Your Xterra was built for adventure, but you can't confidently hit the trail if you can't trust your fuel gauge. The fuel sending unit, or fuel level sensor, is a simple component inside your gas tank responsible for one critical job: telling you how much fuel you have left. It consists of a float attached to a variable resistor. As the fuel level changes, the float moves, changing the electrical resistance and sending a signal to your dashboard gauge. When this component wears out, the signal becomes erratic, leaving you guessing about your remaining range.
This comprehensive guide will walk you through everything you need to know to diagnose and replace the fuel sending unit in your Nissan Xterra. We'll cover the symptoms, the right tools for the job, and detailed, step-by-step instructions for both 1st generation (2000-2004) and 2nd generation (2005-2015) models.
Common Symptoms of a Failing Xterra Fuel Sending Unit
Before you start ordering parts, it’s important to confirm that the sending unit is truly the culprit. The signs are often unmistakable and directly related to your fuel gauge's performance, but they can sometimes be confused with other electrical issues.
Erratic or Inaccurate Fuel Gauge Readings
This is the most common symptom. You might notice your gauge:
- Stuck on Full or Empty: No matter how much fuel is in the tank, the needle doesn't move.
- Jumping Around: The gauge needle swings wildly between full, empty, and somewhere in between while you're driving.
- Showing Empty After a Fill-Up: You fill the tank, but the gauge stubbornly remains on "E".
- Sudden Drops: The gauge might read accurately for a while, then suddenly drop to empty without warning.
Check Engine Light and Diagnostic Codes
A failing fuel level sensor will often trigger the Check Engine Light (CEL) on your dashboard. If you scan your Xterra with an OBD-II scanner, you’ll likely find specific trouble codes related to the fuel level sensor circuit.
- P0460: Fuel Level Sensor "A" Circuit
- P0461: Fuel Level Sensor "A" Circuit Range/Performance
- P0462: Fuel Level Sensor "A" Circuit Low
- P0463: Fuel Level Sensor "A" Circuit High Input
The presence of any of these codes is a strong indicator that the sending unit has failed.
If you're working near the fuel tank, it's a good time to inspect and possibly replace the rear differential fluid for overall drivetrain health. Read the differential fluid DIY guide.
Fuel Warning Light Issues
Along with an inaccurate gauge, the low fuel warning light may behave erratically. It might stay on constantly, even with a full tank, or flicker randomly as the faulty sender sends confusing signals to the vehicle's computer.
How to Diagnose the Fuel Sending Unit
A definitive diagnosis is key to avoiding unnecessary work. While the symptoms above are strong clues, a quick electrical test with a multimeter will confirm the sender is bad before you begin the replacement process.
Ruling Out Other Issues
First, do a quick visual inspection. Check the wiring and connectors leading to the fuel tank for any obvious signs of damage, corrosion, or a loose ground wire. In rare cases, a faulty gauge cluster or a wiring short could mimic the symptoms of a bad sender, but this is less common.
The Multimeter Test: Your Key to Certainty
To be 100% sure, you need to test the sender's variable resistor. This requires accessing the top of the fuel pump module (which is easier on 1st Gen models).
- Access the Sender: Follow the initial steps in the replacement guide below to access the top of the fuel pump assembly.
- Disconnect the Connector: Unplug the electrical connector going to the fuel pump module.
- Identify the Pins: Locate the two pins for the fuel level sensor circuit.
- Set Your Multimeter: Set your digital multimeter to measure resistance (Ohms, Ω).
- Measure Resistance: Connect the multimeter probes to the sender's pins. While a helper or a long tool carefully moves the float arm up and down inside the tank, watch the multimeter reading.
- Analyze the Results: The resistance reading should change smoothly and consistently as the float moves from its lowest point (empty) to its highest point (full). If you see sudden jumps, dead spots (infinite resistance), or no change at all, you have confirmed a bad sending unit.
Essential Tools and Parts for the Job
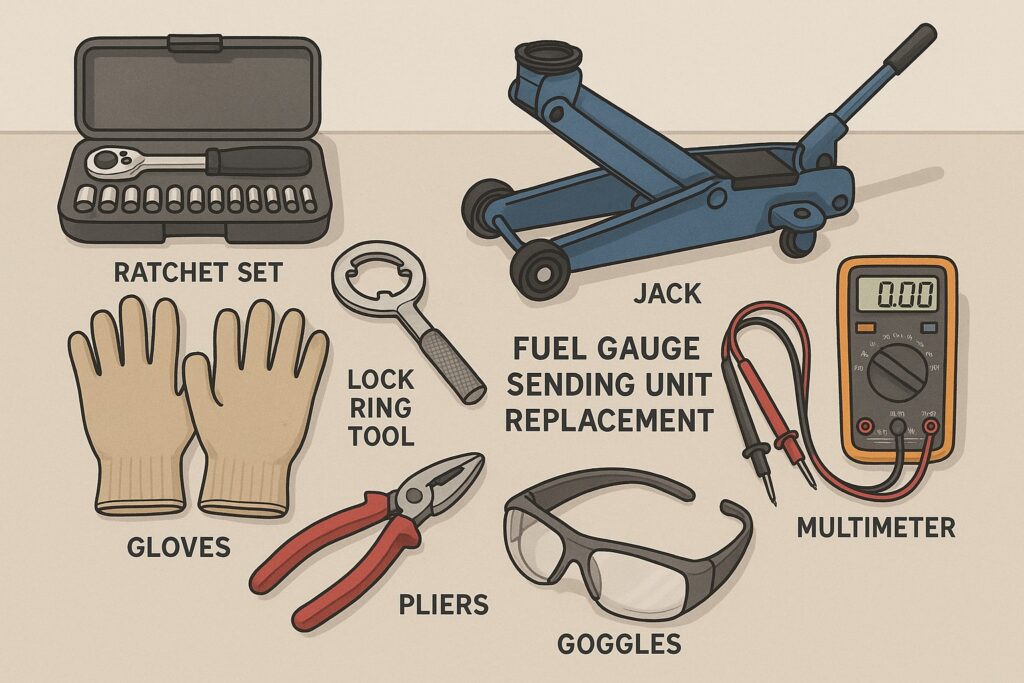
Gathering all your tools and parts beforehand will make the replacement process go much smoother. The required parts are generation-specific, so be sure to order the correct one for your Xterra's model year.
Required Tools
- Safety Gear: Safety goggles and nitrile gloves are a must. Keep a fire extinguisher rated for fuel fires nearby.
- Lifting Equipment: A good floor jack and sturdy jack stands. Wheel chocks for safety.
- Hand Tools:
- Ratchet and socket set (8mm to 17mm)
- Screwdrivers (flathead and Phillips)
- Needle-nose pliers
- Torque wrench
- Fuel System Tools:
- Fuel line quick-disconnect tool set
- Fuel siphon or transfer pump (highly recommended for Gen 2)
- Fuel pump lock-ring tool (or a brass punch/flathead screwdriver)
- Absorbent shop towels or rags
- Diagnostic Tool: A digital multimeter for testing.
Necessary Parts (Generation-Specific)
While you're replacing the sender, it's wise to inspect related components. Many owners choose to replace the entire fuel pump module for peace of mind, as it includes a new pump, strainer, and sender in one unit.
| Component | 1st Gen Xterra (2000-2004) | 2nd Gen Xterra (2005-2015) |
|---|---|---|
| Fuel Sending Unit | OEM Part: 25060-4S426 (Aftermarket options from Dorman, CARMOCAR available) | OEM Part: 25060-ZS00B (Often sold as part of the complete fuel pump module) |
| Fuel Tank Capacity | ~19.4 gallons (73.4 L) | ~21.1 gallons (79.8 L) |
| Associated Parts | Fuel Pump Module Seal/O-Ring: Always replace this to prevent leaks. | Fuel Pump Module Seal/O-Ring: A new seal is critical for reassembly. |
| Fuel Strainer ("Sock"): Inspect and replace if clogged or discolored. | Complete Fuel Pump Assembly: A popular choice as it bundles all key components. |
Step-by-Step Replacement Guide for 1st Gen Xterra (2000-2004)
Owners of a first-generation Xterra are in luck. Nissan included a convenient access panel under the rear seat, which means you don't have to drop the entire fuel tank to perform this service.
- Safety Preparations: Park on a level surface, engage the parking brake, and disconnect the negative battery terminal. To relieve fuel pressure, remove the fuel pump fuse or relay from the fuse box and crank the engine for a few seconds. It should stall out.
- Locate and Remove the Access Panel: Flip up the rear passenger-side seat cushion. You will see a small, rectangular metal plate on the floor. Unscrew the bolts holding it in place and remove the panel to expose the top of the fuel pump assembly.
- Disconnect Lines and Connectors: Clean any dirt and debris from the top of the module. Press the release tabs to unplug the electrical connector. Use your quick-disconnect tool to carefully remove the fuel lines. Have a rag ready to catch any small drips of fuel.
- Remove the Lock Ring: The fuel pump module is held in by a large plastic or metal lock ring. Use a dedicated lock-ring tool or a flathead screwdriver/brass punch placed against one of the lugs. Gently tap it with a hammer in a counter-clockwise direction to loosen it. Unscrew it the rest of the way by hand.
- Extract the Assembly: Carefully lift the entire fuel pump module straight up and out of the fuel tank. Be mindful of the float arm so it doesn't get snagged on the opening.
- Replace the Sending Unit: On a clean workbench, unclip the old sending unit from the side of the pump module. Disconnect its small electrical plug and clip the new unit into place, ensuring the float arm can move freely.
- Reassemble and Test: Carefully guide the assembly back into the tank, making sure the new O-ring seal is seated properly. Hand-tighten the lock ring, then use your tool to snug it down firmly in a clockwise direction. Reconnect the fuel lines and electrical connector, ensuring they click into place. Reconnect the battery, turn the ignition to "ON" (don't start the engine) a few times to prime the system, and check that your fuel gauge is now reading correctly.
Before disconnecting any wiring or starting repairs, always disconnect the battery for safety. See the alternator and battery replacement guide for procedure details.
Step-by-Step Replacement Guide for 2nd Gen Xterra (2005-2015)
For second-generation models, Nissan removed the access panel, so the job requires dropping the fuel tank. This is more involved but is absolutely achievable for a determined DIYer.
Crucial Safety Warning: Working with a fuel tank is inherently dangerous due to flammable vapors. This job must be performed in a well-ventilated area, preferably outdoors. Keep all sources of ignition far away and have a fire extinguisher on hand.
- Vehicle Prep and Fuel Draining: Perform the same safety prep as the 1st Gen models (disconnect battery, relieve pressure). The most important step is to get the tank as empty as possible. Either drive the vehicle until the fuel light comes on or use a siphon pump to safely transfer the fuel to approved containers.
- Raise the Vehicle: Chock the front wheels. Use a floor jack to lift the rear of the Xterra and secure it on jack stands, providing ample room to work underneath.
- Disconnect Hoses and Straps: Position a jack (a transmission jack works best) or a sturdy block of wood under the fuel tank to support its weight. Remove any skid plates covering the tank. Disconnect the filler neck hose and any EVAP/vent lines connected to the tank. Spray penetrating oil on the tank strap bolts if they are rusty, then carefully unbolt the two metal straps holding the tank in place.
- Lower and Remove the Fuel Tank: Slowly lower the jack, allowing the tank to come down a few inches. This will give you better access to the top of the tank to disconnect the main fuel line and electrical connector. Once everything is disconnected, continue lowering the tank and slide it out from under the vehicle.
- Remove the Pump Assembly: With the tank on a stable surface, thoroughly clean the area around the pump module. Use the same lock-ring removal technique described for the 1st Gen model (turn counter-clockwise) to release the assembly.
- Replace the Sending Unit or Module: Carefully lift the module out. Because of the labor involved in dropping the tank, it is highly recommended to replace the entire fuel pump module on 2nd Gen models. This replaces the pump, sender, and strainer all at once.
- Reinstall the Tank: Place the new module into the tank with a fresh seal and tighten the lock ring. Carefully lift the tank back into position under the Xterra. Reconnect the fuel line and electrical connector before fully raising the tank.
- Torque Straps and Final Checks: Secure the tank straps and tighten the bolts to the factory specification, which is approximately 32 ft-lb (44 Nm). Reconnect the filler neck and all vent lines. Reinstall any skid plates, lower the vehicle, reconnect the battery, and test the system.
Draining the fuel tank for a 2nd gen Xterra is much easier if you are familiar with safe fluid siphoning and handling. Check the step-by-step engine oil change guide for fluid handling tips.
DIY vs. Professional Repair: A Cost Breakdown
One of the biggest motivations for tackling this job yourself is the significant cost savings. While parts are relatively inexpensive, shop labor rates can quickly turn this into a pricey repair.
- Parts Cost: A sending unit for a 1st Gen Xterra can cost as little as $50-$70. A complete fuel pump module for a 2nd Gen model typically ranges from $100-$150 for a quality aftermarket unit.
- Dealer Labor Cost: A dealership or independent shop will likely charge 2-4 hours of labor for this job. With shop rates often exceeding $100 per hour, you can expect a total bill in the range of $350-$450 or more.
- The DIY Savings: By investing a few hours of your time, you can complete this repair for the cost of parts alone, easily saving yourself over $300.
| Criteria | DIY Repair | Professional Service |
|---|---|---|
| Cost | $50–$150 (parts only) | $350–$450 (parts & labor) |
| Time Required | 2–4 hours (depending on experience) | 1–2 hours (mechanic’s schedule) |
| Tools Needed | Yes, full automotive toolset required | No, provided by the shop |
| Expertise Needed | Intermediate DIY/mechanical skill | None |
| Warranty | Parts warranty (if purchased new) | Parts + labor warranty |
| Learning Opportunity | High (hands-on experience) | None |
| Convenience | Lower, requires own workspace & time | High, drop off and pick up |
| Risk of Error | Higher (mistakes possible) | Very low |
| Satisfaction | High for hands-on owners | High for those seeking ease |
| Customization | Can choose preferred parts | May be limited to shop’s suppliers |
Pro Tips and Tricks for a Smooth Repair
Keep these tips in mind to avoid common frustrations and ensure a successful, leak-free repair.
- The Stubborn Lock Ring Trick: If the plastic lock ring is stuck, do not use excessive force that could crack it. Use a brass punch (which won't create sparks) or the blunt end of a large screwdriver against the lugs and give it firm, sharp taps with a hammer to break it loose.
- Cleanliness is Non-Negotiable: Before opening the tank, thoroughly clean the area around the fuel pump module. You do not want any dirt, rust, or debris falling into your fuel tank, as it can clog the new filter and pump.
- Test Before You Finalize: After installing the new unit but before reinstalling the access panel or lifting the tank back into place, temporarily reconnect the battery. Turn the key to the "ON" position and confirm the fuel gauge responds. This quick check can save you from having to do the job twice.
- Document with Photos: Especially on 2nd Gen models with multiple hoses, take pictures with your phone before you disconnect anything. This creates an easy visual guide for routing the EVAP and vent lines correctly during reassembly.
After working on the fuel system, it's a good idea to inspect your brake lines and condition, especially if you have the truck in the air. Learn how to bleed your brakes here.
Xterra Fuel Gauge repair FAQ
- Q: What are the most common symptoms of a failing Nissan Xterra fuel gauge sending unit?
A: Erratic or inaccurate fuel readings (stuck needle, jumping readings, always empty after fill-up), check engine light, diagnostic codes (P0460-P0463), and persistent or flickering low fuel warning light. - Q: Which diagnostic codes indicate a bad fuel sending unit on a Nissan Xterra?
A: Codes P0460, P0461, P0462, and P0463, all related to the fuel level sensor circuit, are strong indicators. - Q: How can you confirm the sending unit is the problem and not wiring or the gauge?
A: Do a multimeter resistance test on the sending unit after visually checking wiring. Resistance should change smoothly as the float moves; dead spots or inconsistency confirm failure. - Q: What tools do you need to replace the fuel sending unit?
A: Safety goggles, nitrile gloves, floor jack, jack stands, ratchet/socket set, screwdrivers, pliers, torque wrench, fuel line disconnect tools, drain/siphon tools, shop towels, lock-ring tool, and a digital multimeter. - Q: What is the OEM part number for the 1st Gen Xterra (2000-2004) fuel sending unit?
A: 25060-4S426 (aftermarket options available). - Q: For which Xterra generation is the fuel sending unit easier to replace, and why?
A: The 1st Gen (2000-2004) is easier due to a rear seat access panel; no need to drop the fuel tank. - Q: What safety steps should always be followed when working with the fuel system?
A: Disconnect the battery, relieve pressure, work in a ventilated area, keep sparks/flames away, and have a fuel-rated extinguisher ready. - Q: What is a key tip for loosening a stubborn fuel pump lock ring?
A: Use a brass punch or the blunt end of a screwdriver with a hammer for sharp taps, not brute force. - Q: Why should you test the new sending unit before final reassembly?
A: To verify the gauge responds correctly, preventing repeated disassembly if the issue persists. - Q: How much money can DIY repair save versus dealership costs?
A: DIY typically costs $50–$150 in parts, vs. $350–$450 at a dealer, saving over $300.
Take Control of Your Xterra's Fuel Gauge
A faulty fuel gauge sending unit can be a major annoyance, but it doesn’t have to be an expensive, intimidating repair. For 1st Gen owners, the job is surprisingly straightforward thanks to the under-seat access panel. For 2nd Gen owners, dropping the tank is a more involved process but is a rewarding challenge that puts you in greater command of your vehicle's maintenance.
For a comprehensive look at all fluid replacement intervals and best practices for your Xterra, review the complete maintenance schedule. Explore the full fluid change interval guide here.
By following this guide, gathering the right tools, and working patiently and safely, you can restore your Xterra's fuel gauge to perfect working order. Not only will you save a significant amount of money, but you’ll also gain the satisfaction and confidence that comes from fixing your own rig. So, roll up your sleeves and get ready to tackle this project - your next adventure awaits, and now you’ll know exactly how much fuel you have to get there.