Best Clutch Kit for Xterra (Daily, Towing, & Off‑Road)
Clutch kits for every Nissan Xterra use: Exedy NSK1006 for daily, South Bend Stage 1 HD for towing, XTD Stage 3 for off-road, plus flywheel and CSC tips.

Best Clutch Kit for Nissan Xterra (Daily, Towing, & Off‑Road)
That spongy pedal, the engine revving but not accelerating, the dreaded smell of burning friction material - these are the tell-tale signs of a worn-out clutch. For a rig as capable and versatile as the Nissan Xterra, a failing clutch isn't just an inconvenience; it's a bottleneck that grounds you from daily commutes, heavy towing jobs, and weekend trail adventures. Choosing the right replacement is about more than just getting your truck moving again; it's about matching the clutch's performance to your specific needs.
Whether you're looking for a smooth, factory-feel replacement for your daily driver or a heavy-duty unit that can handle the abuse of rock crawling and towing a camper, the market is filled with options. From OEM-quality organic discs to aggressive ceramic puck-style clutches, picking the wrong one can lead to a frustrating driving experience, premature wear, or even driveline damage. A daily driver doesn't need a grabby race clutch, and a standard replacement kit will quickly surrender under the torque of a modified, overloaded off-road build.
This comprehensive guide will walk you through everything you need to know to select the absolute best clutch kit for your Nissan Xterra. We'll break down the differences between generations, recommend top-tier kits for every application - daily driving, towing, and hardcore off-roading - and provide a detailed guide on the critical components and installation tips you need for a successful replacement.
Quick Picks: The Best Nissan Xterra Clutch Kits at a Glance
For those who need to get right to the point, this table summarizes our top recommendations based on your primary use case. Each of these kits offers a proven combination of performance, durability, and value for its intended purpose.
| Use Case | Recommended Kit | Key Feature | Best For |
|---|---|---|---|
| Daily Driving | Exedy OEM Replacement Kit (NSK1006) | Smooth engagement & factory feel | Stock Xterras used for commuting and light-duty tasks. |
| Towing & Hauling | South Bend Stage 1 HD | High-torque organic disc | Towing trailers, campers, or hauling heavy loads regularly. |
| Off-Roading | XTD Stage 3 Ceramic 6-Puck Kit | Extreme grip & heat resistance | Highly modified rigs, rock crawling, and aggressive trail use. |
| Budget-Friendly | LuK RepSet Clutch Kit | OEM quality at a great price | Light-duty drivers needing a reliable fix without a high cost. |
Understanding Your Xterra's Clutch: Specs by Generation
Before you can choose the right clutch, you need to understand what your Xterra came with from the factory. Nissan used different engines, transmissions, and clutch components across the two generations, and these differences are critical for ensuring proper fitment. Mixing and matching parts is a recipe for disaster.
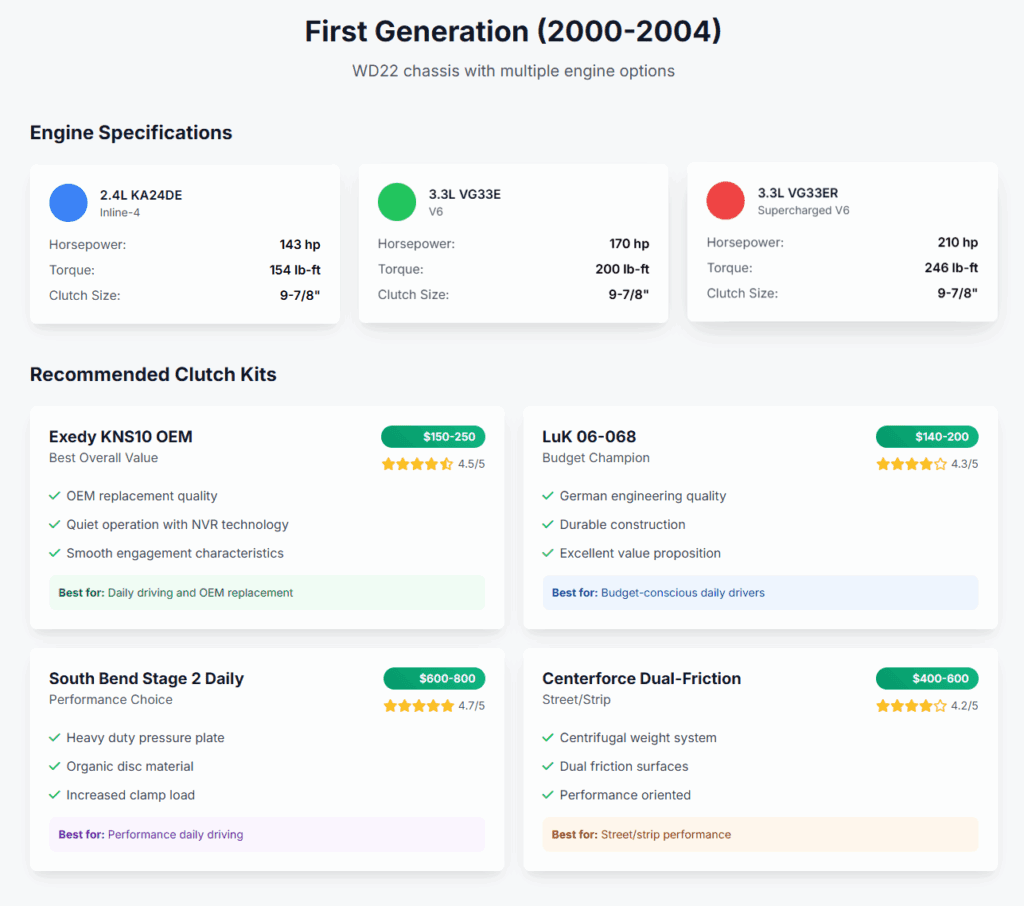
First Generation Xterra (2000–2004)
The first-generation Xterra was offered with two engine options mated to a 5-speed manual transmission, each with a unique clutch setup. These models utilize a traditional and robust single-mass flywheel and an external slave cylinder.
- 2.4L KA24DE 4-Cylinder:
- Clutch Disc: 240 mm (9.45″) diameter
- Spline Count: 24-spline
- Flywheel: Single-mass cast iron (resurfaceable)
- 3.3L VG33E V6:
- Clutch Disc: 250 mm (9.84″) diameter
- Spline Count: 23-spline
- Flywheel: Single-mass cast iron (resurfaceable)
- Hydraulics: Both models use an external slave cylinder that is easy to access and replace without removing the transmission.
Second Generation Xterra (2005–2015)
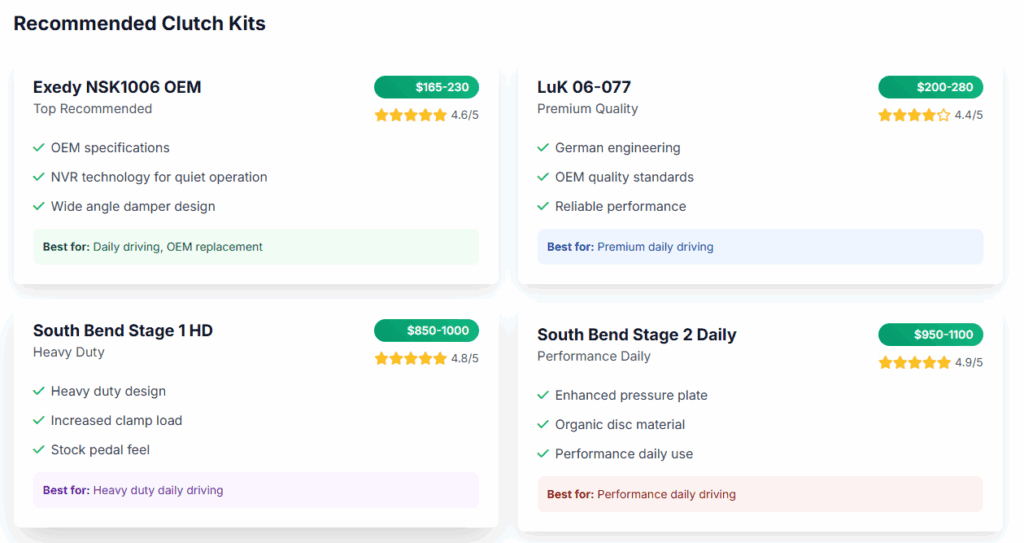
The second-generation Xterra received a significant powertrain upgrade with the powerful 4.0L V6 and a 6-speed manual transmission. This modern setup introduced a dual-mass flywheel to improve refinement but also brought a new hydraulic component that requires special attention.
- 4.0L VQ40DE V6:
- Clutch Disc: 260 mm (10.25″) diameter
- Spline Count: 24-spline
- Flywheel: LUK Dual-Mass Flywheel (DMF)
- Hydraulics: This generation uses an internal concentric slave cylinder (CSC), which integrates the release bearing and slave cylinder into a single unit inside the transmission's bellhousing.
What clutch does a Nissan Xterra use?
A first-generation (2000-2004) Xterra uses a 240mm 24-spline disc for the 2.4L engine or a 250mm 23-spline disc for the 3.3L V6. A second-generation (2005-2015) Xterra with the 4.0L V6 uses a larger 260mm (10.25″) 24-spline clutch disc. OEM kits for all models feature a full-face, sprung-hub organic disc for smooth engagement.
The Best Xterra Clutch Kits for Every Driving Style
The "best" clutch is subjective and depends entirely on how you use your vehicle. A kit designed for rock crawling will feel terrible in stop-and-go traffic, while a stock replacement will burn up quickly when towing a heavy trailer up a steep grade. Here, we break down our top picks for every scenario.
Best for Daily Driving & OEM Replacement
For a stock Xterra used for commuting, errands, and light weekend adventures, you can't beat the feel and reliability of an OEM-style replacement. These kits are designed for smooth engagement, low pedal effort, and quiet operation, just like the day your truck rolled off the showroom floor.
- Top Picks: Exedy NSK1006 (for 4.0L), LuK RepSet, or Valeo OE-Plus kits.
- Friction Material: Full-face organic disc.
- Clamping Force: Stock or slightly above.
- Pros:
- Effortless, smooth pedal feel.
- Quiet and chatter-free operation.
- Excellent lifespan under normal conditions.
- Gentle on the flywheel and driveline.
- Cons:
- Not suitable for heavy towing or aggressive off-roading.
- Can glaze or slip under high heat and load.
Best for Towing & Hauling Heavy Loads
If your Xterra is a workhorse that regularly tows a boat, camper, or heavy utility trailer, you need a clutch with increased clamping force and superior heat resistance. These heavy-duty kits provide the extra muscle to prevent slippage without being overly aggressive for daily driving.
- Top Picks: South Bend Stage 1 HD, Centerforce Dual Friction, ACT HD.
- Friction Material: High-torque organic or a hybrid organic/semi-metallic compound.
- Clamping Force: Significantly higher than stock (e.g., ~350-430 ft-lb).
- Pros:
- Excellent holding power prevents slippage under heavy load.
- More resistant to heat fade on long grades.
- Maintains a street-friendly engagement.
- Cons:
- Pedal effort is noticeably firmer than stock.
- May have a slight chatter on initial engagement.
Best for Off-Roading & Overlanding
When you're crawling over obstacles or navigating technical trails, your clutch takes a beating. Off-road driving often involves repeated slipping to maintain momentum, which generates immense heat. A performance clutch with a ceramic or carbon friction material is essential for durability and fade resistance.
- Top Picks: XTD Stage 3 Ceramic 6-Puck, Clutch Masters Stage 2, Exedy Stage 2.
- Friction Material: Ceramic, carbon-composite, or multi-puck designs.
- Clamping Force: Extremely high, often exceeding 400 ft-lb.
- Pros:
- Incredible grip and holding power for oversized tires and modified engines.
- Highly resistant to heat and abuse.
- Instant, positive engagement.
- Cons:
- Very aggressive, "on/off" engagement is not ideal for city driving.
- Prone to chatter, noise, and driveline shock.
- Can cause accelerated wear on the flywheel surface.
Best Budget-Friendly Options
If you just need to get your Xterra back on the road for light duty without breaking the bank, several reputable budget options are available. These kits typically use standard organic discs and provide an OEM-like feel, but may not have the same longevity as premium brands.
- Top Picks: LuK RepSet Clutch Kit, Action Clutch, or other value brands.
- Friction Material: Standard organic.
- Clamping Force: OEM-spec.
- Pros:
- Most affordable solution.
- Provides a stock-like driving experience.
- Cons:
- May have a shorter service life compared to premium kits.
- Crucial: Double-check part numbers to ensure fitment for your specific year and engine.
Critical Installation Components: Flywheels & Hydraulics
A successful clutch replacement involves more than just the disc and pressure plate. The flywheel and hydraulic system are equally important. Neglecting these components is a common mistake that can lead to poor performance or a complete do-over.
Flywheel Facts: Single-Mass vs. Dual-Mass
The flywheel provides the friction surface for the clutch and stores rotational energy. Your Xterra has one of two types:
- Single-Mass Flywheel (SMF): Found on all 1st-gen Xterras, an SMF is a simple, solid piece of cast iron.
- Pros: Extremely durable, can be resurfaced multiple times, and is less expensive to replace.
- Cons: Transmits more engine vibration and driveline noise (NVH).
- Dual-Mass Flywheel (DMF): Factory equipment on 2nd-gen Xterras, a DMF consists of two masses connected by springs and dampers.
- Pros: Absorbs vibrations for a smoother, quieter ride.
- Cons: Cannot be resurfaced, is expensive to replace, and the internal springs can fail, causing noise and excessive play. Many owners of 2nd-gen Xterras opt for an SMF conversion kit for improved durability, especially for off-road use.
To Resurface or Replace Your Flywheel?
This is a critical decision during any clutch job. The rule of thumb is simple:
Always resurface a single-mass flywheel or replace a dual-mass flywheel when installing a new clutch.
An old, glazed, or warped flywheel surface will prevent the new clutch from bedding in properly, causing slipping and chatter. Also, always use new flywheel bolts and torque them to specification in the correct sequence.
Don't Forget the Hydraulic System
The clutch hydraulic system is what transfers the motion of your foot on the pedal to the clutch fork.
- 1st-Gen (External Slave): The slave cylinder is mounted on the outside of the transmission. It's wise to inspect it for leaks and replace it if there's any doubt.
- 2nd-Gen (Internal CSC): The concentric slave cylinder is a known weak point on the 4.0L VQ40DE engine. Since it's located inside the bellhousing, replacing it requires removing the entire transmission. It is highly recommended to replace the CSC with a new, high-quality unit every time you replace the clutch. Failing to do so is a major gamble.
Pro Guide to a Perfect Xterra Clutch Replacement
Replacing a clutch is an involved job, but it's well within the reach of a seasoned DIY mechanic. Precision and attention to detail are key. Follow these steps for a smooth and successful installation.
1. Preparation and Teardown
Safety first! Ensure the vehicle is securely supported on jack stands. Support the engine from above or with a jack and block of wood under the oil pan before removing the transmission crossmember.
- Disconnect the battery.
- Remove any necessary interior components (shifter, console).
- Remove the front and rear driveshafts.
- Disconnect the exhaust, wiring harnesses, and clutch hydraulic line from the transmission.
- Remove the starter motor.
- Support the transmission with a transmission jack and remove the crossmember.
- Unbolt the transmission from the engine and carefully slide it back and away.
2. Installation and Torque Specs
With the transmission out, you have clear access to the clutch and flywheel.
- Remove the old pressure plate and clutch disc.
- Unbolt and remove the flywheel. Inspect the rear main seal and replace it if it shows any signs of leaking.
- Install the new (or resurfaced) flywheel with new bolts, torquing them in a star pattern to the factory spec (typically 40–60 ft-lb).
- Clean the input shaft splines and apply a very light coat of high-temp grease.
- Use the provided alignment tool to perfectly center the new clutch disc against the flywheel.
- Mount the new pressure plate and tighten the bolts finger-tight.
- Torque the pressure plate bolts in a star pattern, in stages. First to ~10 ft-lb, then to the final specification of 16–22 ft-lb. Do not overtighten.
- Install the new release bearing (or new CSC for 2nd-gen models).
3. Bleeding the Clutch Hydraulics
Once the transmission is reinstalled, you must bleed all air from the hydraulic system.
- Fill the master cylinder reservoir with fresh DOT 3 or DOT 4 brake fluid.
- Have a helper press and hold the clutch pedal.
- Open the bleeder valve on the slave cylinder to release fluid and air, then close it.
- Have your helper release the pedal.
- Repeat this process until no more air bubbles emerge and the pedal feels firm and consistent.
4. The All-Important Break-In Period
Properly breaking in your new clutch is essential for its performance and longevity. For the first 500 miles, drive gently. Avoid high-RPM shifting, full-throttle acceleration, and towing. This allows the friction surfaces to mate perfectly for maximum grip and a long service life.
Tips & Tricks for Your Xterra Clutch Job
Here are a few extra pro tips to make your clutch replacement go even more smoothly and ensure long-term reliability.
- Upgrade Your CSC Preemptively. For any 2005-2015 Xterra, don't even think about reusing the old concentric slave cylinder. The factory units are prone to failure. Investing in a heavy-duty aftermarket CSC is cheap insurance against having to pull the transmission a second time.
- Flush the Entire Hydraulic System. The clutch shares its fluid reservoir with the brake system. This is the perfect time to completely flush the old, contaminated fluid from the entire system with fresh DOT 3/4 fluid. This protects both your new clutch hydraulics and your brake components.
- Bag and Tag Every Bolt. As you remove components like the crossmember, driveshafts, and starter, place their bolts in separate, labeled plastic bags. This simple organizational step eliminates guesswork and saves a massive headache during reassembly.
- Inspect Your Drivetrain While You're There. With the driveshafts out, it's the perfect opportunity to check the U-joints for any play or binding. Replacing worn U-joints now is much easier than doing it as a separate job later.
Xterra Clutch Kit FAQ
- Q: What clutch sizes does the Nissan Xterra use?
A: 2000–2004 models use a 240mm (2.4L) or 250mm (3.3L) disc, while 2005–2015 models use a larger 260mm disc, all with OEM full-face, sprung-hub organic designs.
- Q: Which clutch kit is best for daily driving my Xterra?
A: Exedy NSK1006, LuK RepSet, or Valeo OE-Plus kits are best for stock driving, providing smooth pedal feel and quiet operation.
- Q: What clutch kit should I use for towing and hauling?
A: South Bend Stage 1 HD, Centerforce Dual Friction, or ACT HD offer high-torque organic discs and greater holding power.
- Q: What's the most durable clutch kit for off-roading?
A: XTD Stage 3 Ceramic 6-Puck, Clutch Masters Stage 2, and Exedy Stage 2 kits use ceramic or carbon friction materials for extreme grip.
- Q: Are budget clutch kits reliable?
A: LuK RepSet and Action Clutch offer affordable, OEM-like performance, but may have shorter service life - always verify fitment.
- Q: Should I resurface or replace my flywheel during a clutch job?
A: Always resurface a single-mass flywheel; replace a dual-mass flywheel. Glazed or warped surfaces will cause clutch issues.
- Q: What’s the significance of the hydraulic system?
A: 1st-gen uses external slave cylinders; 2nd-gen uses internal concentric slave cylinders. Replace weak points (like 2nd-gen CSC) with quality upgrades.
- Q: How do I bleed the clutch hydraulics after replacement?
A: Fill with fresh DOT 3/4 fluid, press pedal, open bleeder on slave cylinder, repeat until pedal is firm - ensures no air remains.
- Q: Is a break-in period required for a new clutch?
A: Yes, drive gently for the first 500 miles to let friction surfaces mate properly, avoiding high RPM or full-throttle shifts.
- Q: Any pro tips for a successful Xterra clutch job?
A: Upgrade the CSC (for 2005–2015), flush fluid system, bag/label bolts, inspect U-joints, and take your time for long-term reliability.
Conclusion - What's the best clutch kit
Choosing the best clutch kit for your Nissan Xterra is a decision that directly impacts its performance, reliability, and your overall driving enjoyment. By carefully matching the clutch to your primary use - be it daily commuting, heavy towing, or aggressive off-roading - you ensure the heart of your drivetrain is up to the task. Remember that a successful clutch replacement is a complete system overhaul; always address the flywheel, pilot bearing, and hydraulic components at the same time.
For most owners, an OEM-style kit from a reputable brand like Exedy or LuK will provide years of smooth, trouble-free service. For those who push their rigs harder, investing in a heavy-duty or performance kit from specialists like South Bend or Centerforce will provide the necessary clamping force and durability. By following proper installation procedures and allowing for a gentle break-in period, you can restore that crisp, responsive feel to your pedal and get your Xterra back to conquering the road and the trail with confidence.
More Nissan Xterra DIY Guides
- Nissan Xterra Leaf Spring Replacement: The Complete DIY Guide
- Nissan Xterra Frame Rust Repair: The Complete DIY Guide
- Nissan Xterra Fuel Gauge Sending Unit: Diagnosis & Replacement Guide
- Nissan Xterra SMOD Radiator Bypass: Your Complete Fix Guide
- Nissan Xterra Crank and Cam Sensor Replacement
- Nissan Xterra Timing Chain Noise Fix: A Complete Guide
- Nissan Xterra Heater Hose Firewall Leak: Complete Fix Guide
- Nissan Xterra Catalytic Converter Failure: Symptoms & Solutions
- Nissan Xterra Won’t Start: Complete Troubleshooting Guide
- Nissan Xterra Differential Breather Modification – How To DIY